| Prev | Next |
Walkthrough: Jira Integration
This walkthrough helps you to set up and use the integration capability of Pro Cloud Server to integrate your Enterprise Architect models with the corresponding Jira Software projects, via the Cloud installation option.
Using the integration with Jira you can:
- Link Enterprise Architect elements with their counterparts in Jira
- Create Enterprise Architect elements based on Jira items, and vice-versa
- Synchronize changes between Enterprise Architect and Jira, as and when needed
- Perform a traceability analysis
- Add comments to Jira items from Enterprise Architect
When Pro Cloud Server is installed on your system, it provides a prompt to also install the optional Integration Plug-ins component; by default, the component is installed into the C:\Program Files (x86)\Sparx Systems\Pro Cloud Server\SBPI\ folder (assuming a 64 bit machine is being used). The Integration Plug-ins component includes the:
- Integration (SBPI) Server (sbpi.exe)
- The plug-in .exe file for each of the many integrated tools, including the one for Jira (JiraSbpi.exe)
The JiraSbpi.exe plug-in interacts with Atlassian's issue tracking system. It is able to list a user's favorite filters (also known as starred filters). Each filter will then list all the Jira items returned by the filter. These filters are configured in Jira in a Favorite folder for each user logging in, prior to Enterprise Architect requesting that the Integration Plug-in should connect to them. You can view only those Jira items that are part of a filter, so create appropriate filters in Jira. For example, if you want to link Enterprise Architect Requirements to Jira User Stories, create a filter that will show the relevant User Stories.
Jira itself has two installation options, Jira Cloud and Jira Server. The Jira Server option is being phased out, so these procedures assume that you are working with Jira Cloud. However, if you are working with Jira Server, there are some comments in the procedures to accommodate that.
Access Tokens
Where Jira is hosted on an Atlassian server and not hosted locally, it requires using a TokenID that is created on the Atlassian site, for a single predefined user set for logging into Atlassian. See the Atlassian web site pages on Access Tokens - a general review (https://www.atlassian.com/software/access/guide/elements/api-token-controls#what-are-api-token-controls) and a discussion on creating tokens (https://confluence.atlassian.com/cloud/api-tokens-938839638.html). See the links under Learn More below.
Prerequisites
In order to set up integration between Jira and Enterprise Architect, you must first:
- Be using a licensed installation of Pro Cloud Server with the Integration Plug-ins component, as just discussed
- Select the 'Enable Pro Features (OSLC, WebEA and Integration)' option in the Pro Cloud Server configuration for each Database Manager System hosting your Enterprise Architect models
- Have network access between the PCS server and the Jira server hosting the external Jira installation and its data
- Have user credentials to access the external data
- Have a 'Favorite' folder of appropriate filters set up in Jira, as just discussed
- Be using Enterprise Architect Corporate, Unified or Ultimate edition v14 or later
We will assume that:
- The Integration Server and the Jira Integration Plug-in are to run on the same machine as the Pro Cloud Server
- You are defining the Integration Server options using the 'Integration' tab in the Pro Cloud Server Configuration Client rather than by manually manipulating the registry or configuration files or by using the WebConfig interface
Define starred filters in Jira
The Pro Cloud Server's Jira integration allows access to items which are returned by Jira's starred filters. Before using the integration you should ensure some starred filters have been set up to return the items that you want to be accessible in Enterprise Architect.
To define starred filters in Jira, follow these steps:
- Within Jira, select the 'Filters' dropdown menu, then 'View All Filters'.

- At the top right of the filters list, click on the 'Create ' button.

- Adjust the filter/search settings (such as Project and Type) then use the 'Save as' option to save a new filter.

- Now return to the list of all filters ('Filters | View All Filters'). In the filter list you can use the star icon to add the filter to your starred filters.

- This filter (and items it returns) should now be accessible to the Pro Cloud Server's Jira integration
Identify Jira to Pro Cloud Server and Enterprise Architect
Work through these steps:
- Double-click on the 'Pro Cloud Config' Desktop icon to open the Pro Cloud Config Client window.
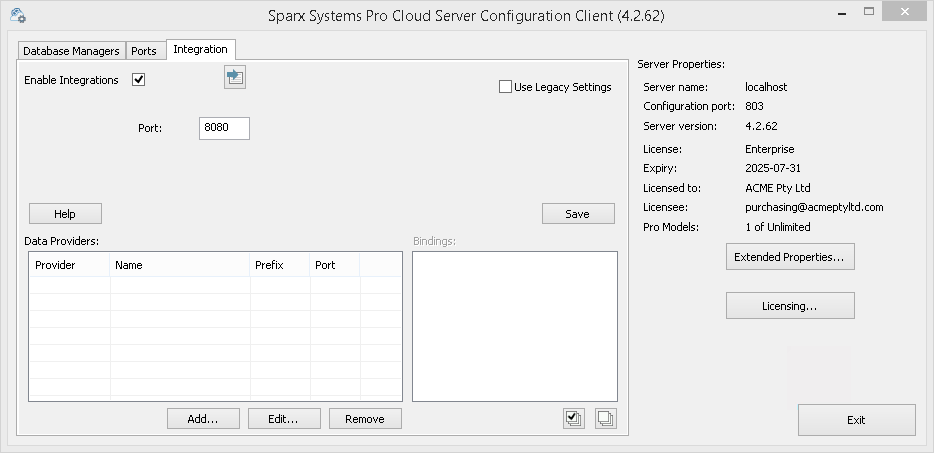
- Select the 'Integration' tab and select the 'Enable Integrations' checkbox. In the 'Port' field type the number of the Port the Integration Server is listening on for requests from the Pro Cloud Server.
- Click on the . The 'Add Data Provider' dialog displays.
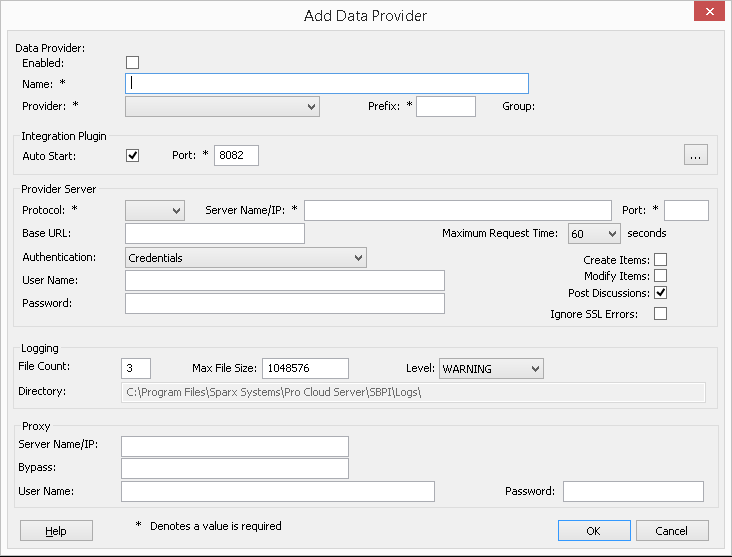
- Select the 'Enabled' checkbox.
- In the 'Name' field, type an appropriate connection name, such as 'Jira'.
- In the 'Provider' field, click on the drop-down arrow and select 'Jira'; this automatically adds 'Jira' to the 'Prefix' field as well.
- In the 'Integration Plugin' panel, in the 'Port' field, type the number of the Port that the Integration Server will use to communicate with the Jira Plug-in.
- In the 'Protocol' field, click on the drop-down arrow and select the protocol that the Jira Plug-in will use to communicate with Jira.
- For a Jira Cloud default installation, this must be 'HTTPS'
- For a Jira Server installation,the default is 'HTTP' - In the 'Server Name/IP' field, type the server name or IP address that the Jira Plug-in will use to communicate with Jira.
- For a Jira Cloud default installation, this must be <account>.atlassian.net
- For a Jira Server installation, the default is <name of server or host> - In the 'Port' field type the number of the Port that the Jira Plug-in will use to communicate with Jira.
- For a Jira Cloud default installation, this must be '443'
- For a Jira Server installation,the default is '8080' - Leave the 'Base URL' field blank for Jira Cloud, and for a default Jira Server installation. The field might be required for non-default Jira Server configurations.
Note that the fields in steps 8 to 11 are concatenated to make a web address; that is: <protocol>://<server>:<port>/baseURL (baseURL included if the field is not blank). - If you leave the 'User' and 'Password' fields blank, then each Enterprise Architect user will be prompted for their personal Jira credentials, which can give a better usability.
- If you prefer to set values in the 'User Name' and 'Password' fields, the values will be used in combination to access the data within Jira. All current Enterprise Architect users of the Jira installation will use the same set of credentials to read the external data.
- Select the 'Create Items', 'Modify Items' and/or 'Post Discussions' checkboxes as necessary, to allow users of the Jira Plug-in to create and/or update items and/or create Discussion posts in Jira using Enterprise Architect.
- If you want the Jira Plug-in to ignore SSL-related errors that occur as a result of communicating with Jira, select the 'Ignore SSL Errors' checkbox.

- You can leave other fields blank or set to their default values. Click on the to complete the configuration. This returns you to the 'Integration' tab of the Pro Cloud Server Configuration Client window.
Identify Enterprise Architect models to Jira
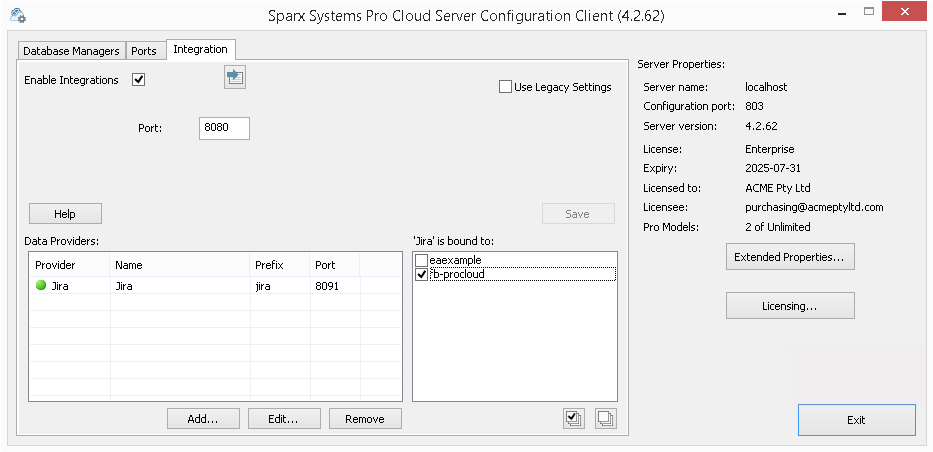
On the 'Integration' tab of the Pro Cloud Server Configuration Client window, you will now see:
- On the lower left of the screen, the 'Data Providers' panel listing Jira as a data Provider
- On the lower right of the screen, the ''Jira' is bound to:' panel displaying a check list of the Enterprise Architect models from your Pro-enabled Database Manager(s)
You can either click on the checkbox against each Enterprise Architect model you want to bind to Jira, or click on the ![]() to select all of them at once.
to select all of them at once.
Click on the .
Restart the PCS Service to apply the changes you have made.
You can now go into one of your Enterprise Architect models and check the integration with Jira.
Test the Integration
In Enterprise Architect open one of the models you have selected in the list: 'Jira' is bound to. See the image above.
- Select the ribbon option Specialize > Tools > System Integration.
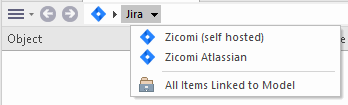
- In the toolbar of the External Data window, click on the drop-down arrow to the right of the 'globe' icon.
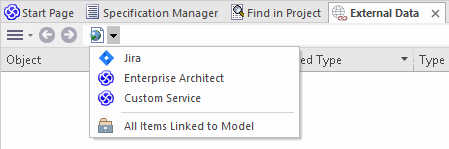
- Select 'Jira' from the list; this adds the provider to the breadcrumb trail in the toolbar.
- Click on 'Jira' in the breadcrumb trail to display a list of Jira providers that have been configured and bound to this model. If nothing is listed then no provider has been bound to this model.
- Click the Provider that was set up and bound to this model, to display a list of Jira projects that are now available for selection to work with in this Enterprise Architect model.
- Select the Jira project to display a list of User filters.
If nothing shows here then you might not have sufficient privileges to view the projects. However, if you have not had any User filters created for you the list just contains '[ ]' or an information message.
(If you cannot see Jira or a list of Jira projects, check through the procedures in this topic, or the broader and more detailed topics in the Integration Plug-ins section to see if there is a step you have missed or a prerequisite that is not satisfied. You can also check the Troubleshooting Help topic.)
Data Mapping
In order for Jira and Enterprise Architect to smoothly exchange data items, you have to review and - where necessary - edit:
- What type of Jira item corresponds to which type of Enterprise Architect element, and
- What property of a Jira item corresponds to which property of an Enterprise Architect element.
These tasks are fully explained in the Configuration Help topic, which uses Jira as the example Data Provider.
Review Jira Data
When you tested the communication between Enterprise Architect and Jira, on the External Data window, you opened the breadcrumb trail to show a list of Jira projects.
When you select one of the projects, you again click on the drop-down arrow and select one of the filters from the list, which then lists the items from that filter in the body of the window.
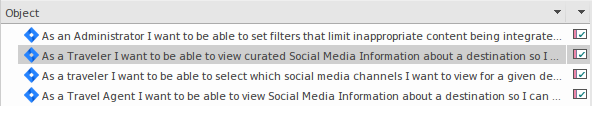
If this list is too long, you can click on the 'Hamburger' icon in the window toolbar and select options such as:
- 'Linked Items' to show only those Jira items that are linked to Enterprise Architect elements
- 'Items Linked to Current Context' to show only the Jira items that are linked to the currently selected Enterprise Architect element or
- 'Unlinked items' to show only those Jira items that have not yet been linked to Enterprise Architect elements
Select the appropriate option, if necessary, and then explore the content of selected Jira items. Each of the Properties window, Notes window, Inspector window and Discuss tab of the Discuss & Review window have separate tabs or versions of the window to display any properties, notes, features and discussions (respectively) of the selected item. These are illustrated in the External Item Details Help topic.
Working with Jira items and Enterprise Architect elements
Having created a working communication between Enterprise Architect and Jira, you can:
- Create a new element in Enterprise Architect linked to a Jira item
- Create a new Jira item linked to an element in Enterprise Architect
- Link an existing element in Enterprise Architect to a Jira item
- Update the Jira item with changes to the Enterprise Architect element
- Update the Enterprise Architect element with changes to the Jira item
- Update all linked Enterprise Architect elements with any changes to the Jira items
These actions are all explained in the Linking Items Help topic, which uses Jira as the example Data Provider.
Learn More
- Integration Plug-ins
- Atlassian Access Tokens (Online resource)
- Create an Access Token (Online Resource)
- Troubleshooting