Please note : This help page is not for the latest version of Enterprise Architect. The latest help can be found here.
Hyperlinks
![]()
You can place a Hyperlink element onto a diagram. This element is a type of text element, but one that can contain a pointer to a range of objects such as associated document files, web pages, Help, model features and even other Enterprise Architect model files. When you double-click on the element, Enterprise Architect executes the link. To add a Hyperlink element, drag the Hyperlink icon from the Common page of the Toolbox onto the diagram.
(Alternatively, click on the Hyperlink icon in the UML Elements toolbar and then click on the diagram.)
![]()
Configure the Hyperlink
When you add the Hyperlink to the diagram, the Hyperlink Details dialog displays. If you want to display the information in a more readable layout, you can resize the dialog.
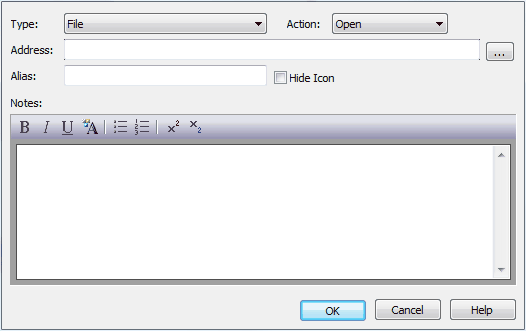
You first select the type of object to link to, by clicking on the drop-down arrow in the Hyperlink Type field. The Hyperlink Details dialog displays the appropriate fields, prompts or dialog to enable you to specify the object to link to. For example, if you intend to hyperlink to:
- an attribute, the Set Attribute dialog displays to enable you to select that attribute
- a file, the Action field displays to enable you to specify whether to Open the file in read only mode, or Edit the file; in either case the file is opened within Enterprise Architect if possible, or, if not possible, with the Windows default viewer/editor for the file type. For example, if you hyperlink to a .rtf file, you can view it in whichever viewer is appropriate; however, you cannot edit .rtf files in Enterprise Architect, so the file always opens in the Windows default .rtf editor.
- a diagram, the Select a Diagram dialog displays, which enables you to select the diagram from anywhere in the project; you can filter the selection to diagrams of certain types.
If you select EA Command, the Hyperlink Address field changes to a drop-down list of Enterprise Architect commands. You can select LocalPath and click on the [ ... ] (Browse) button to display the Local Paths dialog, which you complete as required. Subsequently, when you click on the hyperlink the Local Paths dialog immediately displays and you can apply, switch, expand or update the current path.
Once you have defined the object and its location, you can change the location either by overtyping the Hyperlink Address field or by clicking on the [ ... ] (Browse) button.
In the Alias field, type the text to display in the hyperlink. If you do not provide an alias, either the text defaults to the link itself, or (for certain link targets such as a matrix profile) the dialog generates a simple text instruction.
If you prefer to display only the hyperlink text, without the icon, select the Hide Icon checkbox.
Notes: |
|
Note that you can add notes to the hyperlink, which display in the Hyperlink Details dialog when you right-click on the hyperlink and select the Properties context menu option. You can format these notes using the Notes toolbar.
You can also create:
- A hyperlink to a file
- A hyperlink to a script
- An Action as a hyperlink
- A hyperlink between diagrams.