Please note : This help page is not for the latest version of Enterprise Architect. The latest help can be found here.
Create Columns
What is a Column?
The basic organizational element of a relational database is the column. Every individual item of data entered into a relational database is represented as a value in a column of a row in a table. Columns are represented in the UML Data Modeling Profile as a stereotyped attribute; that is, an attribute with the Column stereotype.
Create Columns
Note: |
For MySQL, before creating columns first add ENUM and SET datatypes. Select the Settings | Database Datatypes menu option and, on the Database Datatypes dialog, in the Product Name field select MySQL. Add the datatypes ENUM and SET. |
To create columns, follow the steps below:
- Right-click on the Table in a diagram to open the context menu, and select the Attributes menu option.
- The <Tablename> Columns dialog displays.
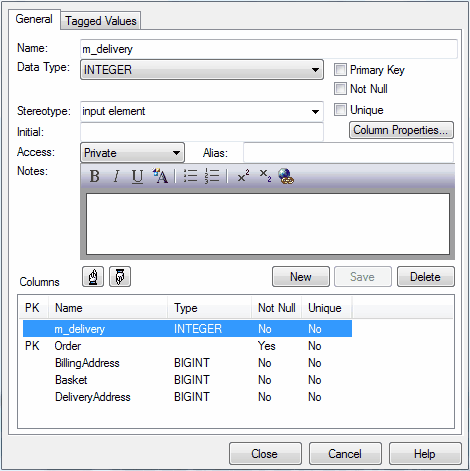
- In the Name field, type the column name.
- In the Data Type field, click on the drop-down arrow and select the data type, and click on the Save button.
Tip: |
If the drop-down list of datatypes is empty, this means that you have not selected a target database for the table. Close the Columns dialog and re-open the Table Properties dialog to set a database type before continuing. To prevent this recurring, set the default database type. |
- The following fields for each column are optional:
- Primary Key - select the checkbox if the column represents the primary key for this table
- Not Null - select the checkbox if empty values are forbidden for this column
- Unique - select the checkbox if it is forbidden for any two values of this column to be identical
- Initial - type a value that can be used as a default value for this column, if required
- Access - click on the drop-down arrow and select a scope of Private, Protected or Public (the field defaults to Public)
- Alias - type an alternative name for the field (for display purposes), if any
- Notes - type any other information necessary to document the column; you can format the text using the Notes toolbar at the top of the field.
Notes: |
|
- Click on the Column Properties button. The Database Columns Properties dialog displays.
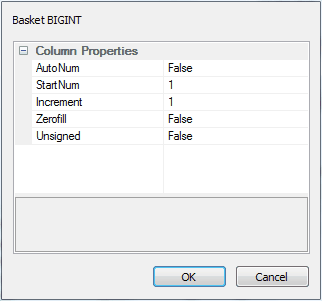
If you require a sequence, such as an Oracle sequence, select the AutoNum property, set the value to True and, if necessary, define the start number and increment. Click on the OK button to return to the <Tablename> Columns dialog. - Click on the Save button and on either the New button to define another column or the Close button to exit from the dialog.
Change the Column Order
To change the column order, follow the steps below:
- On the Columns dialog, highlight a column name in the Columns panel.
- Click on the:
 button to move the column up one position
 button to move the column down one position.