Please note : This help page is not for the latest version of Enterprise Architect. The latest help can be found here.
Import from XMI
You can import a package from an XMI (XML-based) file. This enables you to move Enterprise Architect Model elements between models, for distributed development, manual version control and other benefits.
Important: |
|
Note: |
In the Corporate, Business and Software Engineering, System Engineering and Ultimate editions of Enterprise Architect, if security is enabled you must have Import XMI permission to import packages from XMI. |
You can import the following formats:
- UML 1.3 (XMI 1.0)
- UML 1.3 (XMI 1.1)
- UML 1.4 (XMI 1.2)
- UML 2.0 (XMI 2.1)
- UML 2.1 (XMI 2.1)
- MOF 1.3 (XMI 1.1)
- MOF 1.4 (XMI 1.2)
Enterprise Architect can also import the *.emx and *.uml2 files generated by tools such as Rational Software Architect (RSA) and Rational Software Modeler (RSM).
Import From XMI
To import a package from XMI, follow the steps below:
- In the Project Browser window, select the package into which to import the file.
- Either:
- Right-click and select the Import/Export | Import Package from XMI context menu option, or
- Select the Project | Import/Export | Import Package from XMI menu option.
The Import Package from XMI dialog displays.
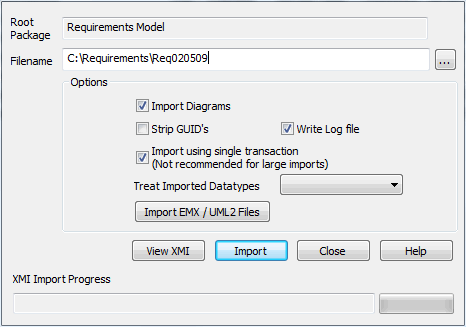
- In the Filename field, type the directory path and filename from which to import the XMI file.
- Select the Import diagrams checkbox to import diagrams.
- Select the Strip GUIDs checkbox to remove Universal Identifier information from the file on import. This enables the import of a package twice into the same model; the second import requires new GUIDs to avoid element collisions.
- Select the Write log file checkbox to write a log of import activity (recommended); the log file is saved in the directory from which the file is being imported.
- Import using single transaction defaults to selected; if the import encounters locking issues, or if you are importing a large XMI file, deselect the checkbox to import the data items separately and identify problem items without blocking the whole import.
- If you are importing from Rose XMI 1.1, click on the Treat Imported Datatypes drop-down arrow and select the datatypes to add to the model.
- Click on the Import button.
The material ("material" includes all pages, documents and on-line graphics) on this web site is protected by copyright law. (C) 1998-2010 Sparx Systems Pty Ltd.