Please note : This help page is not for the latest version of Enterprise Architect. The latest help can be found here.
Set Up Scenario Specification
You can create a specification for a scenario in one of several ways:
- Enter the specification yourself, as described below
- Generate a specification from an Activity diagram created under a Use Case element
- Generate a specification from the notes text of the scenario in the Description tab
- Generate a specification from text held on the clipboard
How To:
To enter the specification yourself, starting with the basic path, follow the steps below:
Step |
Action |
See Also |
|---|---|---|
1 |
In the Scenario field, click on the drop-down arrow and select the Basic Path scenario |
|
2 |
In the new step field in the Action column, type the text of the first step or action |
|
3 |
Tab to the Uses column and, if necessary, type the name of each element used in this step; any elements that are listed in the Context References tab are highlighted in blue and underlined You can also manage the list of elements as context references, and add to the list directly; see the Notes below |
|
4 |
Tab to the Results column and, if necessary, type the outcome of completing this step |
|
5 |
Tab to the State column and, if necessary, type the name of the state into which the step moves the action |
|
6 |
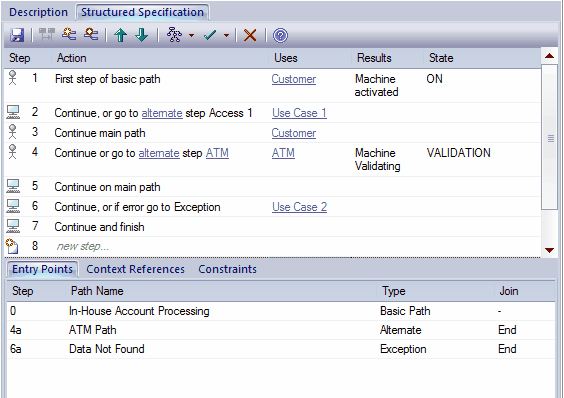
When you move out of the Action column, the next new step field displays underneath Repeat steps 2 to 5 as many times as is necessary. The Structured Specification tab should now resemble the following illustration:
|
|
Notes:
- By default, the steps begin with a user step (indicated by an actor icon) and alternate between user and system (indicated by a screen icon) steps. However, you can control the responsible entity assigned to a step by typing a keyword within the first 15 characters of the text in the Action column; either 'User' or 'Actor' for a user step, or 'System' for a system step. Once a step has been saved, you can change the responsible entity by either double-clicking on the icon or right-clicking on the step, and selecting the Set Step as 'System' or Set Step as 'User' context menu option as required
- An entry for the basic path displays in the Entry Points tab, as Step 0 with no value in the Join column (the basic path does not rejoin itself)
- The values in the Uses, Results and State columns, whilst optional, are significant if you want to generate a diagram from the specification; if you type the name of an element linked to the current element (and listed in the Context References tab), the element name is highlighted and underlined
- In the Uses column, in edit mode, the Manage Uses Context List context menu option enables you to enable and disable Uses cells as linked element lists as well as text fields, across the whole model; when the feature is enabled, the column shows both context-linked elements and manually-entered text, and when disabled only text entries are listed (the context-linked entries are hidden and deactivated, but not deleted - they are re-activated when the feature is enabled)
- As you develop the scenario, you can move steps to different positions in the scenario, and insert new step lines within the body of the scenario
- You can also create constraints on the element that have an impact on the scenarios
- Repeat the Scenario Steps procedure for each scenario you have created; you can now adapt, enhance and interrelate the scenario specifications using the facilities of the Structured Specification tab:
- Structured Specification Toolbar
- Item context menu
- Selected Text context menu
- Entry Points context menu
- Floating Toolbar
Learn More:
- Generate a Scenario from an Activity diagram
- Scenarios
- Structured Specification Item Context Menu
- Generate Diagrams
- Context References Tab
- Structured Specification Toolbar
- Scenario Constraints Tab
- Structured Specification Entry Points Context Menu
- Structured Specification Floating Toolbar
- ScenarioStep Class