Please note : This help page is not for the latest version of Enterprise Architect. The latest help can be found here.
Project Authors
You can define the people who are working on a project, such as the authors of specific elements.
To define the project authors, select the Settings | People menu option. The People dialog displays, defaulted to the Project Author(s) tab.
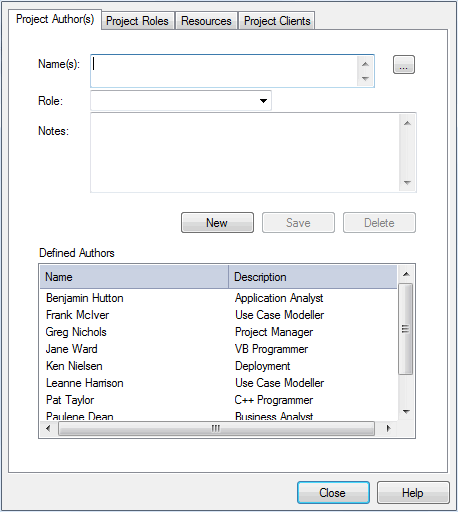
Complete the fields as described below:
Option |
Use to |
||
Name |
Type the name of the person registered as a Project Author. If you are using a Windows Active Directory, you can select names from the directory. Click on the [ ... ] (Browse) button to display the Select Users dialog. You can also type a list of names separated by semi-colons. This enables you to define a group of people sharing a role, such as a team of Developers, Testers or Analysts. Do not leave any spaces between the names and the semicolon.
|
||
Role |
Specify the role the Project Author plays in the project (such as Designer, Analyst, or Architect). You can type a role name or click on the drop-down arrow and select a role defined through the Project Roles tab.
|
||
Notes |
Type any additional notes concerning the Project Author. |
||
Defined Authors |
Review the Project Authors already defined. |
Click on the Save button to add the new names to the Defined Authors list.
To add further Authors, click on the New button.
To delete a Project Author, click on the name in the Defined Authors list and click on the Delete button.
Note: |
You can transport these author definitions between models, using the Export Reference Data and Import Reference Data options on the Tools menu. |
Select from User Directory
If your company is using a Windows Active Directory, you can select the Project Author names from the local or corporate-wide directory. To do this, follow the steps below:
- On the Project Author(s) tab, click on the [ ... ] button. The Select Users dialog displays.
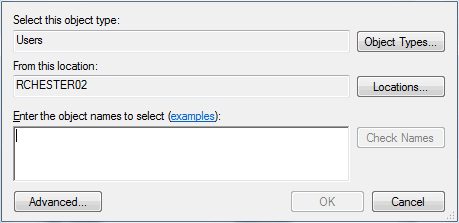
- Click on the Object Types button and select the checkbox for the object type User.
- Click on the OK button to return to the Select Users dialog.
- Click on the Locations button. The Locations dialog displays.

- Click on the appropriate area or level of the directory, and click on the OK button. The Select Users dialog redisplays.
- In the Enter the object names to search field, type the first letter of the user name to search for.
- Click on the Check Names button. The Multiple Names Found dialog displays, listing the names starting with the specified letter found in the directory location.
- Click on the required name (or press and hold [Ctrl] and click on several names), and click on the OK button. The simple Select Users dialog redisplays, with the selected names listed.
- Click on the OK button. The Project Authors tab redisplays, with the selected name or names in the Name(s) field.