Please note : This help page is not for the latest version of Enterprise Architect. The latest help can be found here.
Add Stereotypes and Metaclasses
When you are extending the UML to develop a domain-specific toolset, you start by creating a Profile package for the stereotypes you intend to customize. This package has at least one child Class diagram, and it is on this child diagram that you specify:
| • | The types of object that you are extending, represented by Metaclass elements, and |
| • | The way in which each object is extended, represented by Stereotype elements |
You can qualify the effect of a Stereotype on a Metaclass using a range of other tools, including:
| • | Shape Scripts in the Stereotype |
| • | Tagged Values, defined by attributes in the Stereotype element |
| • | Structured Tagged Value Classes, defined using attributes in the Stereotype element |
| • | Enumerations, defined using attributes in the Stereotype element |
| • | Tagged Value connectors, to identify possible values for a Tagged Value in an element generated with a Stereotype |
| • | Constraints on the Stereotype element |
| • | Special attributes, that define specific default behavior of stereotyped elements, such as the initial size and color of the element |
| • | Modifying the default appearance of the Stereotype element |
Add Metaclasses and Stereotypes to a Profile
Step |
Description |
See also |
||||||||||||||
|---|---|---|---|---|---|---|---|---|---|---|---|---|---|---|---|---|
1 |
Open the child diagram of the Profile Package.
|
|||||||||||||||
2 |
Drag the Metaclass element from the Profile page of the Toolbox onto the diagram. The Create New Metaclass dialog displays, listing the types of element, connector and (within those two lists) feature that you can extend.
|
|
||||||||||||||
3 |
Scroll through the Element and/or Connector lists and tick one or more object types that you want to extend.
|
|
||||||||||||||
4 |
Click on the OK button. For each checkbox that you have selected, a new Metaclass element is created on the diagram.
|
|
||||||||||||||
5 |
Drag a Stereotype element from the Toolbox onto the diagram. If the Properties dialog does not display, double-click on the element on the diagram.
|
|
||||||||||||||
6 |
In the Name field, type a name for the stereotype.
|
|
||||||||||||||
7 |
Click on the OK button.
|
|
||||||||||||||
8 |
Click on the Extension relationship in the Toolbox and drag the connection from the Stereotype element to the Metaclass element that it will extend.
|
|
||||||||||||||
9 |
Your diagram now resembles the one shown below:
|
|
||||||||||||||
10 |
Optionally, you can now add to your Stereotype element:
You can also define the default appearance of the element or connector as required. |
Define Stereotype Tagged Values Add An Enumeration to a Stereotype Define a Structured Tagged Value Use the Tagged Value Connector
|

Notes
| • | If you intend to extend a large number of model elements, rather than putting all of them on one diagram you can create additional child Class diagrams under the Profile package and add different types of Metaclass elements to different diagrams; in this case you save the package as the Profile, not the individual diagrams |
| • | If you want to have a stereotype extending more than one metaclass, create one Stereotype element with an Extension connector to each of the Metaclass elements, as shown below: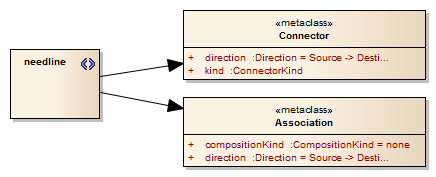 |
| • | Stereotype elements must have unique names, but Metaclass elements can have the same name (for example, there can be several Action Metaclasses, each with a different ActionKind attribute) |
Learn more
Learning Center topics
| • | (Alt+F1) | Modeling Languages | Build a Profile | Create a New Stereotype |


