| Prev | Next |
Pro Cloud Server Configuration Client - Application
At any point after installation you can configure the Pro Cloud Server using the Configuration Client application; the installer will create a Pro Cloud Config Client shortcut on the desktop.
By default the Configuration Client executable is accessible from these folders, depending on which architecture of Pro Cloud Server is installed, 32 or 64 bit:
- 32 bit - 'C:\Program Files (x86)\Sparx Systems\Pro Cloud Server\Client' or
- 64 bit - 'C:\Program Files\Sparx Systems\Pro Cloud Server\Client'
The Configuration Client can be used from any machine on your local network; however, communications between it and the Pro Cloud Server are not secure, so it should only be used from within a secure network.
The Configuration Client is used to configure various settings related to the Pro Cloud Server and the repositories it connects to. When the application first starts, a prompt to enter the address of the Pro Cloud Server to connect to is displayed (see the Pro Cloud Server Logon Screen Help topic for details). Once you have connected, the main screen displays.
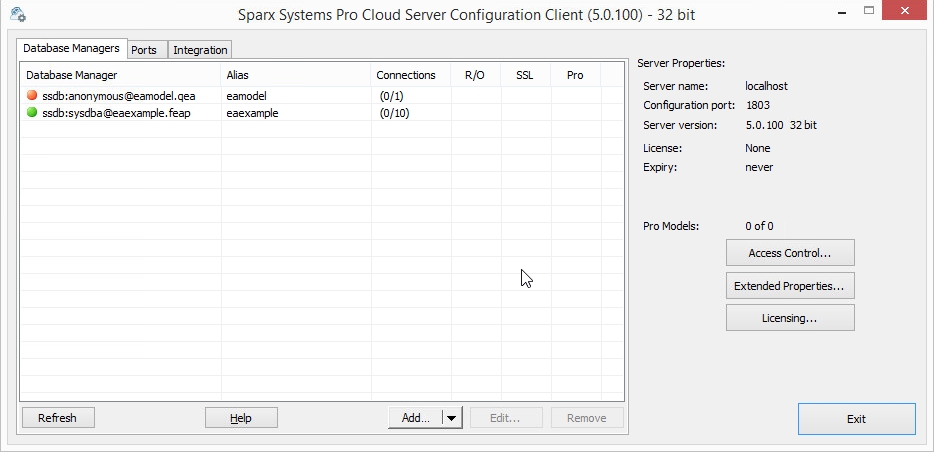
The Main Screen
This screen shows a list of all defined database managers and the details of the connected Pro Cloud Server. It is also the entry point for all management functions, such as configuring your License, setting the ports the Pro Cloud Server listens on, and maintaining database connections.
Sparx Systems Pro Cloud Server supports connections to these DBMS products:
- Firebird
- Microsoft SQL Server
- MySQL
- Oracle
- PostgreSQL
Item |
Description |
See also |
|---|---|---|
|
Database Managers |
This tab lists the defined repositories that the Pro Cloud Server makes available to clients. Each database manager definition contains the details of one database connection and a number of other properties that control how it will function. |
Database Managers |
|
Ports |
This tab allows you to view and configure Ports that the Pro Cloud Server will allow connections on for accessing models. |
Port Configuration |
|
Integration |
This tab allows you to configure Cloud models to use Integration Plug-ins. Integration Plug-ins require a valid Pro Cloud Server license; see the Integration Plug-ins Help topic for details. |
Integration Plug-ins |
|
Server Properties |
The properties on the right hand side specify the details of the connected Pro Cloud Server. Main Properties
The Edition, Expiry and Pro Models properties apply to Pro Cloud Server licenses. If no license has been added, or the license is invalid or has expired, then the Edition will display 'None' and the Expiry 'Never'. |
|
|
Extended Properties |
Click on this button to display the extended properties for the connected Pro Cloud Server. A number of these extended properties can also be modified. |
Extended Server Properties |
|
Licensing |
Click on this button to view and manage the connected Pro Cloud Server's licenses. This button allows you to enter the license for the Pro Cloud Server. |
Pro Cloud Server Licensing |
|
Refresh |
Click on this button to reload the contents of the 'Database Managers' list. |
|
|
Add... |
Click on this button to add a new database manager. If the main area of this button is clicked the default action of adding a Database Manager using the Native Connection screen is shown, however if the drop arrow area is clicked the user is presented with two options: Native Connection & ODBC Connection. |
Add Database Manager - Native Add Database Manager - ODBC |
|
Help |
Click on this button to show the relevant User Guide page that describes the current screen. |
|
|
Edit... |
Click on this button to view and manage the settings for the currently selected database manager. |
Configure Database Manager |
|
Remove |
Click on this button to permanently delete the selected database manager from the Cloud Server. |