| Prev | Next |
Configure Model Users
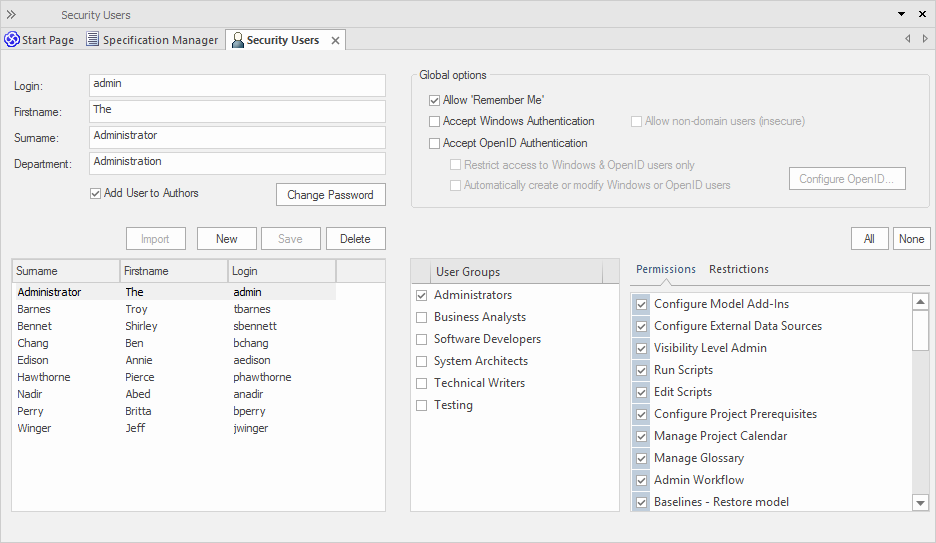
When you have enabled security, you create the user definition for each user that has access to the model. The user definition consists of the user ID and password, the permissions and restrictions the user has, the user groups the user is a member of, and whether the user ID is provided and validated by external user authentication mechanisms.
Access
|
Ribbon |
Settings > Security > Users The 'Security Users' window displays. |
Set Up a User for Your Model
Step |
Action |
See also |
|---|---|---|
|
1 |
You can manage users in multiple ways:
If you are importing the user IDs from a Windows Active Directory, do not complete any user detail fields on this dialog, but select the 'Accept Windows Authentication' checkbox and go to the Import User IDs from Active Directory Help topic. Note that the option 'Allow non-domain users (insecure)' will, if selected, also allow auto-login of a user who is not a user of the domain. If the option is not selected and the user is not a user of the domain, the auto-login is aborted. The option defaults to unselected when security is being enabled, but in existing enabled systems it will be selected.  in Sparx Systems Enterprise Architect.") To allow automatic management of users by a single Sign-On (SSO) system, tick the SSO mechanism to use (either 'Accept Windows Authentication' or 'Accept OpenID Authentication') and tick 'Automatically create or modify Windows or OpenID users'. See the Single Sign-On (SSO) Options Help topic for more details. |
Import User IDs From Active Directory Single Sign-On (SSO) Single Sign-On (SSO) Options |
|
2 |
In the:
Optionally, in the 'Department' field, type the name of the user's department. The 'Add User to Authors' checkbox defaults to selected, to add the new user to the list of authors of model elements. If the user is not to be added to the list of authors, deselect the checkbox. |
|
|
3 |
Click on the , and then click on the . The 'Change Password' dialog displays. |
|
|
4 |
In the 'New password' field, type the user's password. This can be any number of characters in length. (As this is a new user, the 'Enter old password' field is disabled.) |
|
|
5 |
In the 'Retype new' field, type the user's password again, for confirmation. |
|
|
6 |
Click on the . A Password Changed message displays. Click on the OK button to return to the 'Security Users' dialog. |
|
|
7 |
In the 'User Groups' panel, select the checkbox against each user group that the user is to be a member of. This assigns to the user all permissions that the selected groups have. |
Configure Model Groups |
|
8 |
In the 'User Permissions' panel, select the checkbox against each permission that you want to assign to the user as an individual. If a permission is grayed out and already ticked, the user already has that permission as a member of a User Group. |
List of Available Permissions |
|
9 |
Click on the 'Restrictions' tab and select the checkbox against each restriction to set against the user ID as an individual. If a restriction is grayed out and already ticked, the user already has that restriction as a member of a User Group. |
List of Available Permissions |
|
10 |
The top right corner of the Enterprise Architect display shows your user ID, with a short drop-down menu providing personal access options including whether your login credentials are stored and automatically applied when you open the model ('Remember Me'). If you want to use this option, you must select the 'Allow 'Remember Me'' checkbox on this 'Security Users' dialog. |
User Button |
|
11 |
The user definition is complete. You can now either:
|
Notes
- You must have 'Security - Manage Users' permission to maintain users; the initial Admin administrator and Administrators group automatically have this permission
- You can transport the user definitions between models as Reference Data, using the 'Settings > Model > Transfer > Export Reference Data' and 'Import Reference Data' options
- In communications between users, such as in Chats or Discussions, it is possible to represent each user by a personalized Avatar against their messages and postings; to load and assign the images for these Avatars, see the Set User Avatar Help topic