| Prev | Next |
Walkthrough: OpenID with Azure
This walkthrough helps you to set up Enterprise Architect to log in to models with Single-Sign-On (SSO) using Azure users via OpenID.
The walkthrough will detail the minimum setup required to get a working example. There are numerous extra options available in Azure that can be customized to suit the requirements of your organization.
This guide requires Enterprise Architect version 16 or later to work with claims in the ID token, and to allow automatic creation of new users based on their group memberships.
Add an App Registration for Enterprise Architect
- Log in to the Azure portal: https://portal.azure.com/.
- Click the side menu drop-down and click on 'Azure Active Directory'.

- Click on 'App registrations' and on the New registration button.

- Fill in the form.
- Give the application a name - this will be visible to end users when they consent to the app (if applicable, the app can be given global consent by an administrator).
- Select the 'Single tenant' radio button (unless you understand the use of 'Multitenant').
- Redirect URI:
- Select the 'Public client/native (mobile & desktop)' option from the drop-down option
- Type in 'http://localhost:8888/openid/callback'
- Click on the .

Application Details: URL, Client ID
After the new app registration is created, you should see the details of the application. Copy the 'Application (client) ID'. This will be pasted into Enterprise Architect (step 6 in this procedure).

- Open Enterprise Architect and open the model; it is assumed that the model has been set to use model security already.
- Log in with an account that has permissions to edit users and groups (for example, 'admin').
- Click on the 'Settings > Security > Users' ribbon option.
- In the 'Global Options' panel select the 'Accept OpenID Authentication' checkbox.
- Click on the Configure OpenID button.

- Paste the copied 'Application (client) ID' into the 'Client ID' field.

- Add 'profile' to the 'Scope' field to allow the user's full name to be passed back.
- Add 'offline_access' to the 'Scope' field to allow users to refresh their authentication tokens automatically using 'refresh tokens'.
- For this walkthrough we will match against 'upn'; type 'upn' in the 'Claim to Match to Local User' field.
- (Optional) Add 'groups' to the 'Claim to Match to Local Groups' field. See the 'Automatically create or modify Windows or OpenID Users' option section later in this topic, on how to use groups to automatically create or modify users based on their OpenID group membership.
- Select the 'Use ID Token for claims' checkbox. Deselect the 'Use User Info for claims' checkbox.
(Note: In Release 16 or later it is now possible to get claims direct from the ID token rather than via the User Info endpoint. This has many advantages, including being more compliant with the standard (claims in the User Info endpoint are optional and aren't customizable in Azure) as well as reducing the number of internet calls to the OpenID provider.)
- In Azure, click on 'Endpoints'. This lists the URL 'endpoints' that applications can connect to Azure with.
- Copy the URL for 'OpenID Connect metadata document', but exclude the '.well-known/openid-configuration' portion.
- In Enterprise Architect, paste the URL into the 'OpenID URL' field.

Add API Permissions
- Click on 'API permissions'.
- Click on 'Add a permission'.

- Click on 'Microsoft Graph'.

- Click on 'Delegated permissions'.

- Select all permissions under 'OpenId permissions': 'email', 'offline_access', 'openid' and 'profile'.

Claim to Match to Local User
Enterprise Architect will log a user on if the claim returned from the OpenID provider matches the user login in the Enterprise Architect model. Care should be taken to use a secure claim; that is, one that can not be modified by an end user, but only by an administrator of the Azure system. By default, UPNs cannot be modified by a regular user.
There should be some consideration of which claim will be used to match to the local user login in Enterprise Architect. Microsoft recommends that a stable GUID (such as 'sub' or, 'oid') should be used to avoid any issues with name changes that might affect an email, username or UPN. However, a UPN allows for a human-readable user login, which might be preferable.
With no further configuration you can match to either the 'oid' or 'sub' claims (as recommended by Microsoft) as these are always passed back in the ID token. To enable matching against the UPN or email address of the user, further configuration is required.
If the option to allow automatic creation of users in Enterprise Architect is to be used, then it is also required for a user to have a first and last name, and for these to be passed back to Enterprise Architect in the token. These are optional claims that need to be manually selected too.
- Click on 'Token configuration'.
- Click on 'Add optional claim'.

- Select 'ID'.
- Select 'family_name, given_name'.
- Optionally select another claim that will be used to match the user login in Enterprise Architect. Common choices are 'upn', 'email', 'verified_primary_email'.
For this walkthrough, select 'upn'. - Click on 'Add'.

Add User to Azure
This walkthrough will add a single user to demonstrate OpenID authentication. Full user setup is outside the scope of this guide.
- Back in the main 'Active Directory' section, click on 'Users'.
- Click on 'New user'.

- Fill in the details for the new user. Here we create a simple test user:
- Make a note of the password
- Click on 'Create'

Test the Configuration in Enterprise Architect
This is enough to get a simple example working from within Enterprise Architect.
- Back in Enterprise Architect, click on the in the Configure OpenID... window.
- Click on ''.

This will pop up your internet browser and require you to log in to your Microsoft Account (for Azure). - Log in as the newly created user. (Note that your credentials might have been cached by the browser; log out of all Microsoft services and close your browser before performing this test.)
- You might be prompted to create a new password. Again, make note of the new password for later logins.
- You will be prompted to consent to allow the new Azure App access to your profile.
(Note that it is possible for an administrator in Azure to consent to the application on behalf of all users.)

- The browser will now show a success message. You can close the browser and return to Enterprise Architect.
- Enterprise Architect will show a success message with the details matched in the claims.

- Click on the on the success message.
- Click on the OK button on the Configure OpenID... window to save the settings.
Add Matching User to Enterprise Architect
Add a new user to Enterprise Architect with a matching 'Login' field.
- Select the 'Settings > Security > Users' ribbon option.
- Copy the User Principal Name (UPN) of the Azure user and paste it into the 'Login' field.
- Type in a name (this does not need to match the Azure user's name).
- Click on the .

Test Logging in to Model
- Close and re-open Enterprise Architect.
- Open the model.
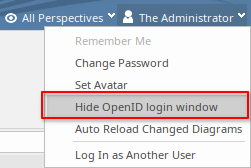
- The same OpenID Authentication screen displays; click on ''.

Nb: If the standard Login to EA Repository dialog appears rather than the OpenID Authentication dialog, unselect the option Hide OpenID logon window in:
- If required, log in to Azure in the internet browser, then close the browser and return to Enterprise Architect where you are now logged in as the new user.
- You can also confirm the logged in user at the top-right of Enterprise Architect. The logged in user's name appears with a drop-down menu of user security options.

- The System Output window will detail your attempted logins. Note that 'groups' did not match, as that has not been configured at this point in the walkthrough.

At this point, if you are going to manually add users to Enterprise Architect then there is no need to complete any more steps.
If you want to enable the 'Automatically create or modify Windows or OpenID Users' option then continue to the next section.
'Automatically create or modify Windows or OpenID Users' option
This option allows you to set up groups in Azure, and link the groups to local groups in Enterprise Architect. Users can then be automatically created when they first attempt to log in. New and existing users will have their group membership updated whenever they log in, to match the linked groups in Azure.
Add Group Claim to ID Token
In a similar way to how the UPN and names claims were added, add a groups claim to the ID token.
- Click on the 'Azure > Azure Active Directory > App registrations' option.
- Click on your new application.
- Select 'Token configuration' from the sidebar.
- Click on 'Add groups claim'.
- Select 'Security groups'.
- Expand the ID section.
- [Optional] As with choosing a claim to match to the Enterprise Architect login name, some consideration should be given to the claim used to match groups to local groups in Enterprise Architect. The default selection here is 'Group ID'. This is a GUID string that can be easily copied around and will stay the same even if the group name changes. However, it is less clear which group is matched when viewing the linkage in Enterprise Architect, so one of the sAMAccountName settings might be more appropriate. In this guide we will use the default selection of 'Group ID'.
- Click on the .

Add New Azure Group
In the 'Azure Active Directory':
- Select 'Groups' from the sidebar menu.

- Click on 'New Group'.

- Leave the 'Group type' set to 'Security'.
- Type in a name for the group, such as 'EA Users', 'EA Administrators' or 'EA Read-only'.
- Click on 'No members selected' to add the test user to the group.

- Select the test user and click on 'Select'.

- Click on 'Create' to finish creating the new group.
- Refresh the list of groups (this can take up to 30 seconds).
- Copy the group's 'Object Id' for use in the next step.

- See the earlier Application Details: URL, Client ID section.
Link Group in Enterprise Architect
- Open Enterprise Architect.
- Open the model; cancel the OpenID login and login as an administrator.
- Select the 'Settings > Security > Groups' ribbon option.
- Create a new group. Name and description do not need to match the name in Azure.
- Paste the Azure group's 'Object ID' into the 'OpenID Group' field.
- Click on the to create the new group.

Enable the 'Automatically create or modify Windows or OpenID Users' option:
- Close the 'Groups' tab.
- Select the 'Settings > Security > Users' ribbon option.
- Select the 'Automatically create or modify Windows or OpenID Users' option.

Now is a good time to re-test the OpenID configuration to check that groups' claims are present in the ID Token, and that the group linkage is correct.
- Click on the 'Configure OpenID...' option.
- If 'groups' is not already shown in the 'Claim to Match to Local Groups' field, type it in.
- Click on the .
- Click on ''.
- Log in to Azure, if required by the browser.
The result will show in Enterprise Architect, showing the user's name as well as the Azure group and the local Enterprise Architect group that it is linked to

Final Test
To test the 'Automatically create or modify Windows or OpenID Users' option:
- Close and re-open Enterprise Architect.
- Log in to the model using OpenID. The System Output window will indicate any automatic creation of users, and any group assignments based on linked OpenID groups.
