| Prev | Next |
Add/Edit Data Provider
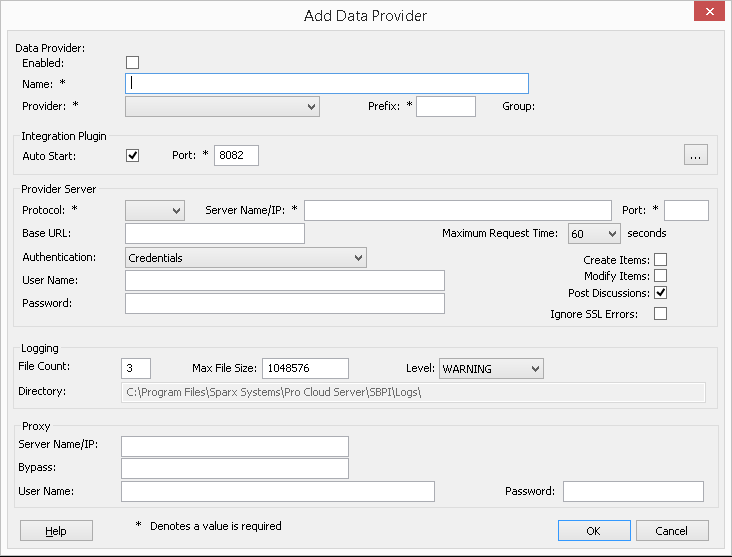
The Add/Edit Data Provider screen will be shown whenever you request to create a new Data Provider or edit an existing one. The screen's behavior will be identical in either mode, the one difference being that the details of the selected Data Provider will be displayed when the screen loads in 'Edit' mode.
When you choose to add a new Data Provider, the screen will initially display as shown:
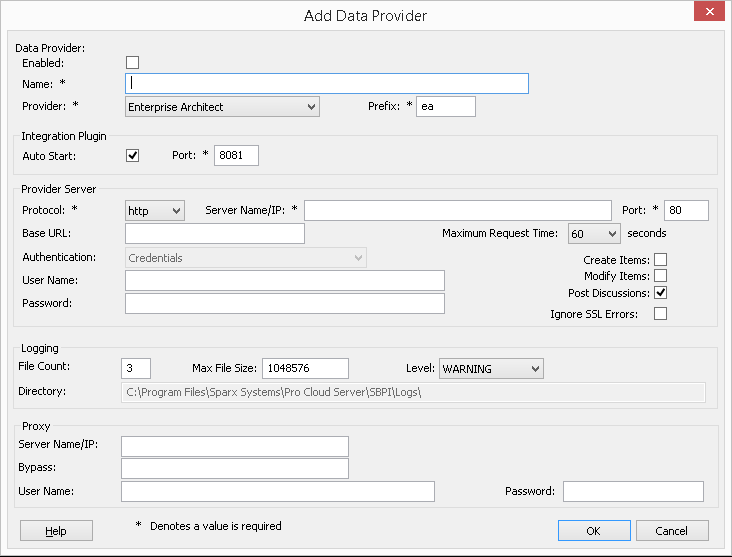
Wherever possible the Add/Edit Data Provider screen will fill each field with a default value in order to make it easier for you; if the default values are not correct, simply overwrite them. To this end, whenever the 'Provider' value is changed, a number of other fields will be set to the default values for the new Provider, such as the Data Provider's Prefix, as shown here when Enterprise Architect is selected:
Note: When defining a Data Provider there are a number of mandatory fields (denoted with a '*') that require a value before the Data Provider can be saved.
Data Provider settings
Item |
Description |
See also |
|---|---|---|
|
Enabled |
Default Value: unchecked This value controls if the Integration Server (SBPI.exe) should allow communications to be forwarded to this Data Provider. |
|
|
Name |
This value represents the friendly name for the current Data Provider. It will be shown to users of Enterprise Architect. |
|
|
Provider |
This value specifies the Provider type of the current Data Provider; only supported values can be used. As mentioned, whenever this value is changed a number of other fields will be automatically updated to make data entry easier for the user. |
|
|
Prefix |
This value represents a short unique name to identify the current Data Provider. This value will be saved against every Enterprise Architect element that is linked to an external element. |
|
|
Group |
This field is available only when the 'Custom Integration' provider type is selected. Typically in Enterprise Architect, integrations are grouped by the Provider type (such as 'Jira' or 'Dropbox'). For Custom Integrations, the Grouping is applied based on the value entered in this field. |
|
|
Max Request Time |
This field is available only when the 'Custom Service' provider type is selected. This value represents the maximum amount of time (in seconds) that calls to the Provider system will wait before timing out. Increasing this value is particularly useful when the Provider systems are remote or have slow performance. The default value is 60 seconds. Note: This is a new setting introduced in Pro Cloud Server v4.2 build 65. |
Integration Plug-in settings
This group of settings defines the relationship between the Integration Plug-in and the Integration Server and how the two interact.
Item |
Description |
See also |
|---|---|---|
|
Auto Start |
Default Value: Checked This value controls if the Integration Server (SBPI.exe) should maintain a running process (*sbpi.exe) for this Data Provider. For standard Integration Plug-ins we would expect this value to be checked; however, for custom ones it might be useful to not auto start the Plug-in and instead manually control when it is running, particularly while developing it. |
|
|
Port |
Default Value: 8081 This value represents the Port that the Integration Server should use to communicate with the Integration Plug-in. The Integration Server assumes the Port is relative to the current machine (or http://localhost:{port}). Each Integration Plug-in requires a unique Port number, which will be checked when an attempt is made to save the Plug-in's settings. However, the Pro Cloud Server can only check what Ports are in use by the Pro Cloud Server itself and its components, there is still a possibility of a Port clash with other applications. |
|
|
Protocol |
This value represents the protocol that the Integration Server should use to communicate with the Integration Plug-in; in the simplest configuration this will be 'HTTP'. |
|
|
DLL Path |
This field is only available for 'Custom Service', 'Custom Integration' and 'Translator' provider types. This value represents the physical path to the custom DLL, that will be called by the CustomService.exe or CustomIntegration.exe Data Provider processes. As a convenience, the application populates the drop list with all .DLL files that are present in the .\SBPI\Custom\ folder (C:\Program Files (x86)\Sparx Systems\Pro Cloud Server\SBPI\Custom\). |
Custom Properties
The Custom Properties section is only shown for Data Providers of type 'Custom Service'.
Item |
Description |
See also |
|---|---|---|
|
List of Custom Properties |
Lists the current properties of the Custom Data Provider. |
|
|
Add |
This button shows the 'Add SBPI Provider Custom Property' screen and allows entry of a new custom property, defined as an Item/Value pair. |
|
|
Edit |
This button shows the 'Edit SBPI Provider Custom Property' screen and allows modification of an existing custom property definition. |
|
|
Delete |
This button permanently removes the selected Custom Property from the current Data Provider. |
Provider Server settings
This group of settings defines the details of the external data provider, such as Dropbox, Jira or TFS. The Integration Plug-in will use the defined details to connect to the remote system and retrieve data from it so that it can be sent back to Enterprise Architect. The combination of 'Protocol', 'Server Name 'and 'Port' must be resolvable by the server hosting the Integration Plug-in, which in the simplest case is the Pro Cloud Server.
Item |
Description |
See also |
|---|---|---|
|
Protocol |
This value represents the protocol that the Integration Plug-in should use to communicate with the external Data Provider. Note: Most online Cloud-hosted providers require https and Port 443. |
|
|
Server Name/IP |
This value represents the Server Name or IP address that the Integration Plug-in should use to communicate with the external Data Provider. |
|
|
Port |
This value represents the Port that the Integration Plug-in should use to communicate with the external Data Provider. Note: Most online hosted accounts operate via https, which requires a Port of 443. Self-hosted servers will depend on the individual server configuration.
|
|
|
Base URL |
Some external Data Providers allow for the concept of multiple repositories at a single location; for such Data Providers this field acts as a filter. For example, it is possible to use another Enterprise Architect model as an external data source; in this case the 'Protocol', 'Server' and 'Port' determine the Pro Cloud Server (for example, http://myEAServer:804) while the 'Base URL' is the DB Alias of the repository (myModel). Thus: http://myEAServer:804/myModel Details for specific providers:
|
|
|
Maximum Request Time |
This value represents the maximum amount of time (in seconds) that calls to the Provider system will wait before timing out. Increasing this value is particularly useful when the Provider systems are remote or have slow performance. The default value is 60 seconds. Note: This is a new setting introduced in Pro Cloud Server v4.2 build 65. |
|
|
Authentication |
Default Value: Credentials This value allows the selection of the type of Authentication that should be used for the Provider, the valid options are Credentials and OAuth. When 'Credentials' is selected it would be expected that a User Name and Password would be entered. When 'OAuth' is selected it would be expected that the Advanced Authentication options would be filled in on the Data Provider Advanced Authentication screen. Note 1: this option is only enabled if the selected Provider supports multiple forms of authentication, for example: Dropbox, Jira, Salesforce, ServiceNow, SharePoint and Wrike Note 2: this option was introduced in Pro Cloud Server v5.0 build 100, prior releases only support credential based authentication. |
|
|
User Name |
This value represents the user name that should be used (in combination with the password) to access the data within the external system. If a value is defined in this field all Enterprise Architect users of the current Data Provider will use the same set of credentials to read the external system. Otherwise, if the user name field is left empty, Enterprise Architect will prompt each user independently for their credentials. This value is only shown when the Authentication of 'Credentials' is selected. Note: For many online Cloud accounts, the username can be an email address for the account. |
|
|
Password |
This value represents the matching password for the user name specified in the 'User Name' field. This value is only shown when the Authentication of 'Credentials' is selected. Note: For Atlassian Cloud hosted accounts (Jira, Confluence) the use of regular passwords has been replaced with an API Key. See the Atlassian documentation on how to obtain an API key and paste the API key into the password field. |
|
|
Advanced... |
This button is used to show the Data Provider Advanced Authentication screen and is only visible when the Authentication of OAuth is selected. |
|
|
Create Items |
Default value: unchecked This checkbox controls if Enterprise Architect users are able to create new items within the external system. |
|
|
Modify Items |
Default value: unchecked This checkbox controls if Enterprise Architect users are able to modify the details of external items within the external system. |
|
|
Post Discussions |
Default value: checked This checkbox controls if Enterprise Architect users are able to create discussions against elements within the external system. |
|
|
Ignore SSL Errors |
Default value: unchecked This checkbox controls if the Integration Plug-in should ignore SSL related errors that occur as a result of communicating with the external system. |
Logging settings
This group of settings define how the Integration Plug-in will create entries in its log file(s). Since the Integration Plug-ins run without user intervention, it is important for them to be able to write any messages or reports of potential problems to a log file. However, special consideration must be given to ensuring that performance isn't impacted by writing to such files, which is possible if the log file continually grows without limits. It is also unreasonable to expect that manual intervention should be required to ensure that the size and number of log files don't impact performance. For these reasons each Integration Plug-in has its own set of log files and configuration options to manage those log files.
The current log file will always include a '1' on the end of its filename. A new log file will be created whenever the Integration Plug-in is started or the physical size of the current log file reaches the Max File Size. When this occurs all existing files will be 'rolled over', meaning their file numbers will be incremented and a new '{filename}1.log' created. If the roll over process causes more files to exist than the 'File Count' setting allows, these additional files will be deleted.
Item |
Description |
See also |
|---|---|---|
|
File Count |
Default value: 3 This value represents the 'rolling' number of log files that should be retained for the current Integration Plug-in. |
|
|
Max File Size |
Default value: 1048576 This value represents the maximum size, in number of bytes, that a log file can reach before a new log file is created. |
|
|
Level |
Default value: WARNING This value represents the maximum level of messages that should be written to the log file. The levels are: OFF, FATAL, WARNING, INFO and SYSTEM. A defined log level is inclusive of all lower levels; therefore if a Plug-in is set to a log level of INFO then all FATAL, WARNING and INFO messages will be written to its log file. |
|
|
Directory |
(READ-ONLY) This field displays the physically location of the directory into which the log files for the current Data Provider will be saved. |
Proxy settings
This group of settings defines how the Integration Plug-in should communicate with the External Data Provider when they are separated by a Proxy Server.
Item |
Description |
See also |
|---|---|---|
|
Server Name/IP |
The server name (or IP) and Port number of the Proxy Server; for example, proxyserver.com:3131 |
|
|
Bypass |
This field provides a mechanism for certain addresses to bypass the proxy; it accepts multiple values separated by semi-colons (;). For example, 192.168.*;*.localdomain.com;www.mydomain.com |
|
|
User Name |
If the Proxy Server requires credentials, this field provides the user name. |
|
|
Password |
If the Proxy Server requires credentials, this field provides the user password. |