| Prev | Next |
WebEA Installation and Configuration
The Sparx Systems Pro Cloud Server product is installed using a standard Microsoft Windows Installer package that includes a number of optional components. WebEA is one of these components and is installed by default. It is possible to change the install location of WebEA; however, if the default settings are used WebEA will be installed into the C:\Program Files (x86)\Sparx Systems\Pro Cloud Server\WebEA\ folder (assuming a 64 bit machine is being used).
See the Pro Cloud Server Installation and Pro Cloud Server Configuration Help topics for a full description of how to install and configure the Sparx Systems Pro Cloud Server.
If you have already have setup WebEA and are wanting to update to a newer versions, refer to the Updating WebEA to a New Version topic.
Important: If you are installing the Pro Cloud Server on a machine that already has the Sparx Systems Cloud Services or Sparx Systems WAN Optimizer installed then these should be uninstalled first.
WebEA Server Requirements
In order to run WebEA in your environment you must have:
- A Web Server (Apache or IIS) capable of hosting PHP v8.1 (or later)
- A Web Server with these standard PHP extensions installed and enabled: core, curl, date, gettext, hash, json, libxml, mbstring, pcre, OpenSSL, session, standard and tokenizer
- A Web Server with PHP sessions enabled
- Connectivity between the web server and the server hosting the Pro Cloud Server
- A base folder (on the web server) to store the WebEA website pages
Configuration Steps
The installation of the WebEA application should have already been completed by following the steps outlined in the Pro Cloud Server Installation Help topic, making sure that the WebEA component was installed.
In addition to installing the Pro Cloud server, WebEA also needs a web server to host it. In the simplest configuration the web server would be installed on the same machine as the Pro Cloud Server.
Configuring WebEA applies these steps:
Step |
Action |
See also |
|---|---|---|
|
1 |
Decide what models are going to be available to WebEA users. At the same time it is worth considering these points, which will determine the configuration options of each model:
|
|
|
2 |
Use the Cloud Configuration Client and define a Port to be used for access to your Cloud Models. Ensure that the 'OSLC Supported' option has been set to true. After adding or modifying Port configurations, ensure the Windows service 'Sparx Systems Professional Cloud' is restarted. |
Port Configuration |
|
3 |
Ensure a database manager is defined for each model decided on in step 1, in the Pro Cloud Server's database manager list. The process to do this is as outlined in Sparx Systems Pro Cloud Server Configuration Client, in Add Database Manager. |
Add Database Manager - ODBC |
|
4 |
For each of the models decided on in step 1, select the model on the 'Sparx Systems Pro Cloud Server Configuration Client', click on the and select the 'Enable Pro Features (OSLC, WebEA and Integration)' checkbox. |
|
|
5 |
Ensure that your Pro Cloud Server has a valid License, loaded by completing these steps:
When the Sparx Systems Sales team return your License Certificate:
The Pro Cloud Server should now have a valid License loaded. |
|
|
6 |
Check that you can access the model(s) in Enterprise Architect using the 'Connect to Cloud' option. After opening each model in Enterprise Architect, enable the 'Data Cache' options and click on the to generate the initial set of viewable diagrams and Linked Documents. See the Model Configuration topic for details. |
Connecting Enterprise Architect to a Cloud Model |
|
7 |
Download, install and configure your web server for PHP, according to your requirements. Tip: XAMPP is the most common Apache/PHP web server that includes all the required components; it is available for Windows/Linux and OS X at: https://www.apachefriends.org/download.html WebEA has been tested on all of the currently available versions of PHP, but if your environment has no special requirements then Sparx Systems would recommend v8.1.5 for Windows. All further Quick Start points will assume this configuration. Note: WebEA only requires the minimum XAMPP installation, Apache and PHP; it does not require MySQL, FileZilla Mercury, Tomcat or any of the other optional components, so if you have no need for these components Sparx Systems would recommend to not install them. |
|
|
8 |
Define and configure a website for WebEA in your web server. As there are many different web servers and configurations, configuring the web site for WebEA, deciding what Port the web server will listen to, and making sure the website is secure from external attacks, are all outside the scope of this documentation. Tip: Using the default XAMPP configuration, the Port for the default website is 80 and the base folder is at 'C:\xampp\htdocs'. XAMPP will already have added files to this folder; WebEA does not require these files, so if you have no need for them, move them to a backup location. |
|
|
9 |
Copy the contents of the entire WebEA installation folder ('C:\Program Files (x86)\Sparx Systems\Pro Cloud Server\WebEA\') to the base folder of the website. Tip: Copy the WebEA folder from 'C:\Program Files (x86)\Sparx Systems\Pro Cloud Server\WebEA\' to 'C:\xampp\htdocs'. Special Note regarding reinstalls: Before updating the WebEA files, take a backup of the files you have modified; that is, \includes\webea_config.ini and \includes\webea_strings.ini. |
|
|
10 |
Due to the sensitive nature of some of the information contained in the WebEA configuration file, we recommend that the '\includes\' folder within the WebEA folder is severely restricted so that only PHP can access the files within. For example, in Apache this is achieved with this entry in the Apache configure file: <Directory "{website_path}/includes"> AllowOverride none options none Require all denied </Directory> Once your web server is configured and the WebEA application files copied into the base folder, start or restart the web server. Tip: Using the XAMPP control panel, Stop/Start Apache. |
|
|
11 |
Edit the '\includes\webea_config.ini' file and define each model decided on in step 1. See the How to configure WebEA models Help topic for more details on what each option means in WebEA's config file. Tip: Edit the 'C:\xampp\htdocs\includes\webea_config.ini' file, and update all parameters with the prefix 'SSCS_' to that of a defined repository in your Cloud Service. Special Note regarding reinstalls: If you a have a previous backup of the \includes\webea_config.ini file and wish to use the same configuration, you can simply restore the backup file. |
Configure WebEA models - via Text Editor |
|
12 |
On a remote machine, open an internet browser and enter the URL of http://{yourwebserver}/login.php, where the value '{yourwebserver}' is either the name or IP number of the machine hosting the WebEA website. This should display the WebEA login screen that lists the models defined in the webea_config.ini file. |
|
|
13 |
Other considerations:
|
Model Configuration
Action |
Description |
See also |
|---|---|---|
|
Configure Enterprise Architect model options |
By default, diagrams and Linked Documents are not saved in a format that is viewable by web browsers. In order for users of WebEA to view these components, Enterprise Architect must be configured to generate (and store) viewable versions of them whenever changes are made. The options to generate viewable diagrams and Linked Documents are defined at the model level. With the model open in Enterprise Architect, select the 'Settings > Model > Options' ribbon option. On the 'Manage Model Options' dialog, refer to the 'Data Cache' options on the 'Cloud' page. 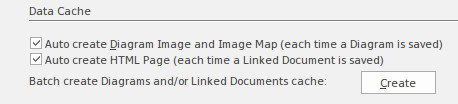 The first option (if enabled), in addition to saving a diagram normally will also generate and save a static image of the diagram. The second option (if enabled), in addition to saving a Linked Document normally will also generate and save the document in HTML format. If these options are not enabled, diagrams and Linked Documents will not be viewable from within WebEA. When initially configuring a model to auto-create viewable diagrams and Linked Documents, it is advisable to click on the to generate the initial set of viewable diagrams and Linked Documents. While this is not mandatory, viewable versions of all existing diagrams and Linked Documents will not exist until they are saved. Note: This approach is relevant when all Enterprise Architect users are using a build later than 1350. If, however, some of your user base are using older versions of Enterprise Architect then updates to diagrams and Linked Documents will not be reflected immediately when saved. See the How to configure automatic viewable components Help topic for the recommended approach to overcome this situation. |
Model Options How to configure automatic viewable components Cloud Page |
|
Configure model users |
It is possible for WebEA users to connect to user security enabled models in one of two ways:
|
Configure Model Users |
|
Single Sign-On (SSO) |
WebEA supports these Single Sign-On Systems:
Provided the Enterprise Architect model has been configured for Single Sign-On, users will have the option to use Single Sign-On when accessing the model via WebEA. Note: The IIS Windows Authentication setting can cause a conflict with WebEA's Windows Authentication option. If you are using IIS and wish to use WebEA's '' then the WebEA site itself must have Windows Authentication set to Disabled. |
Single Sign-On (SSO) with WebEA |
Configuring your WebEA site for HTTPS (SSL)
As there are many different web servers and configurations, configuring your WebEA site for HTTPS access is outside the scope of this documentation.
Please refer to the relevant documentation for your web server. For example, the Apache "Apache SSL/TLS Encryption" documentation or the Microsoft "How To Set Up an HTTPS Service in IIS" help topic.
Configuring the Pro Cloud Server to use HTTPS (SSL)
As with Enterprise Architect, WebEA can access models either via HTTP or HTTPS. Using HTTPS requires you to have a Port configured for HTTPS access as described in the Add a Port Definition topic.
In addition, if you are using your own CA to sign certificates, then also see the Configuring WebEA to Trust Your Own Certificate Authority (CA) Help topic.
Learn more
- Pro Cloud Server Installation
- Pro Cloud Server Configuration
- How to configure WebEA Localization
- How to configure automatic viewable components
- Updating WebEA to a New Version
Acknowledgements
WebEA incorporates certain components developed by third parties. Sparx Systems acknowledges the contribution made to the WebEA product by these components.
- jQuery v3.5.1 - jQuery Foundation
- NicEdit ©2007-2008, Brian Kirchoff, under license from MIT
- Date Picker for jQuery v5.1.1, Keith Wood, under license from MIT