| Prev | Next |
Reviews
A Review element is a simple yet powerful mechanism for capturing, in real time, discussions concerned with a particular event on one or more elements and/or diagrams. Typically, a Project Manager or other coordinator will create a Review element specifically to discuss one or more objects for a project phase, project stage or other category of review, over a defined period. A number of reviewers then 'join' the review and enter discussion points and responses in the Collaborate window. Note that you can only be joined to one Review element at a time.
The most direct and structured scenario would be for the review coordinator to create the Review element through the Reviews view. The Review element is a composite element to which the review coordinator would add a review diagram (as a 'Review Set') and then add to that diagram the elements and/or diagrams (as Navigation Cells) to be reviewed. A joined reviewer simply selects objects on the diagram and creates discussion topics or responses on each object using the 'Review' tab of the Collaborate window. The process for an element under review can be monitored and eventually approved by one or more designated 'Approvers' assigned to the individual element through the Review tab of the Collaborate window. The Project Manager might also set a status that, when an element under review reaches it, locks the element against review until it assumes a different status, as described at the end of this topic.
The Review element also acts as a bridge to continue focused discussions in subsequent work sessions.
The review comments pertinent to an element can be displayed in that element on a diagram, in the Review Compartment of the element.
If you want to simply comment on or discuss an element or diagram without capturing your discussion in a formal review, use the 'Discuss' tab of the Collaborate window. See the Discussions Help topic.
Using Review Elements
Review elements are used to plan and coordinate a formal review of part of your model, defining:
- When the review is to start and end
- What elements or diagrams are to be reviewed (and, as the review progresses, which objects have not yet been reviewed)
- The current status of the review
- Any specific instructions for performing the review
- Who is involved in the review
- Any resources to use during the review
- The priority of the review
The start and end date information is defined in two special EAReview Tagged Values (on the Review element 'Properties' dialog, see the 'General' page and 'EAReview' tab):
- EndDate - the date on which the Review will be complete with no further discussions expected
- StartDate - the date from which users can join the review, and add discussions and responses
Other information can be provided through the Review element's normal element properties including Linked Documents, Notes and associated Note elements, Tagged Values and attributes. Review elements and their contents can be the subject of searches and document generation, all of which add to the information-gathering and grouping purposes of the element. The element also has a child diagram that aids planning, management and coordination of the review, and that provides a quick overview of and access to the elements under review.
Review elements can be used in a number of contexts, including model development, testing, delivery, maintenance and management. They can be added to specific Review diagrams - which have their own 'Review' Toolbox page - or to more general diagrams, using 'Review' icons from the 'Review', 'Artifact', 'Maintenance' or 'Management' toolbox pages.
Review elements are generally set up and managed within Enterprise Architect, but users both of Enterprise Architect and of the WebEA facility can use Review elements to direct their input to discussions on project and model reviews.
Creating a Review element
Typically, to create a Review element:
- Open the Reviews View (the 'Start > Collaborate > Review > Manage Reviews' ribbon option).
- Right-click on the View background and select the 'New Review' option; the 'Create Review' dialog displays, with the 'Name' field defaulting to the name of the currently-selected Package.
- If necessary, overtype the name with a different Review element name.
- In the 'Status' field click on the drop-down arrow and select the appropriate status.
- In the 'Start' field, click on the drop-down arrow and select the date on which the review starts.
- In the 'End' field, click on the drop-down arrow and select the date on which the review should complete. Click on the .
- In response to the prompt for the owner Package, either accept the current Package or browse for a different Package. Click on the OK button.
- You are automatically joined to the review, in the Collaborate window, and can create some initial discussion points. A Review diagram is automatically created and displayed, containing the Review element.
Alternatively, you could start by creating a Review diagram (a Custom diagram in the 'Extended' category) or a diagram of any other type, and drag onto it the 'Review' icon from the Diagram Toolbox (as indicated in the Using Review Elements section); the icon and element have these appearances:
![]()

The element defaults to the Infoview style, which you can edit or disable. You would then display the element 'Properties' dialog and provide the start and end dates on the 'General' page 'EAReview' tab.
Assign Approvers
If you intend to assign review Approvers to some or all of the elements under review, you can do this through the 'Review' tab of the Collaborate window (press and select the 'Review' tab), after adding the elements to be reviewed to the Review diagram. Simply:
- Click on the appropriate element in the Review diagram or Browser window (or, subsequently, in the Reviews view).
- Right-click on the element in the Collaborate window and select the 'Create Approver' menu option. The 'Create Approver' dialog displays.
- Click on the and - in the list - double-click on the name of the required Approver. You can at this point click on the Add button again to add another Approver, or repeat this process from step 1; the end result is the same.
- Click on the . The name of each Approver is added as a separate item to the element in the Reviews window and the Collaborate window; if this is not visible, click on the expansion arrow for the element. The Approvers are listed in alphabetical order.
As the review progresses, the Approver(s) will monitor the process until an appropriate point to change the status (from 'Open' to 'Awaiting Review' or 'Approved', usually). If there are two or more Approvers, when one changes the status a standard message is automatically sent by Model Mail to the other Approvers, in this form:
<approver name> has updated the Approval Status for <element_name> in the review Review - <name>.
The status has changed from <original status> to <new status>.
Please check the Review item and action as required.
A link to the element under review enables the Approver to access the element directly.
Alternatively, rather than send a message to indicate they have taken action, an Approver might want to remind another Approver to take action. In this case, in the Reviews view, the first Approver would right-click on the required Approver name and select the 'Send Approval Reminder' option. A standard message is displayed and, if required, the sender can add further text and/or additional addressees. The standard message has this format:
A reminder that you are an Approver on the item <element name> and action may now be required as part of that Review.
Please check the Review item and action as required.
Again, the recipient has a link to the element under review, to access it directly.
Locating Review elements
In order to join a review, you have to locate the available Review elements and select the appropriate one.
Select the 'Start > Collaborate > Review > Manage Reviews' ribbon option. The Reviews view displays, showing the Review elements that exist in the model, grouped according to the 'Status' value.
Having listed the available reviews, you can join one by right-clicking on it and selecting the 'Join Review' option. This makes the review your Active Review, and the entry displays in bold. (Right-click on the View background and select the 'Refresh' option.) This review remains your Active Review after you log out and log in again, until you specifically select the 'Leave Review' option.
Further information on the Reviews view is provided in the Manage Reviews section later in this topic.
There are a number of alternative options for locating Review elements. In the header of the 'Review' tab in the Collaborate window, click on the  icon and select one of these options:
- 'Manage Reviews' to open the Reviews view, as just described, to list all Review elements
- 'Current Review Details' to display the discussion history of your current review, and to show the details of the elements reviewed
- 'Find Current Review in Browser' to locate your active Review element in the Browser window
You can also select one of the six reports from the 'Find in Project' window, Discussions group (select the 'Explore > Search > Model' ribbon option and the 'Discussions' option in the drop-down list in the first field):
- Recently Discussed Elements - lists the elements that have recently been discussed in reviews
- Recent Element Posts - lists the recent discussion comments that have been posted against elements under review
- Review - lists the Review elements that exist in the model
- Recently Modified Reviews - generates a list of Review elements that have been recently created or modified
- Recently Discussed Reviews - generates a list of Review elements in which discussions have taken place
- Open Reviews - generates a list of Review elements with the status 'Open', which can be joined for discussion
Performing Reviews
To join a review, select the 'Start > Collaborate > Reviews > Manage Reviews' option, right-click on the required review from the Reviews view and select the 'Join Review' context menu option.
Alternatively, to join a review you could:
- Right-click on the appropriate Review element in a diagram, the Browser window or the results of a model search, and select the 'Join Review' context menu option
- If a review is shown in the 'Review' tab of the Collaborate window, right-click on it and select the 'Join Review' option
The Collaborate window displays at the Review tab; the name of the review element then becomes the button name at the top of the screen, and the name of the selected element being reviewed displays beneath that.
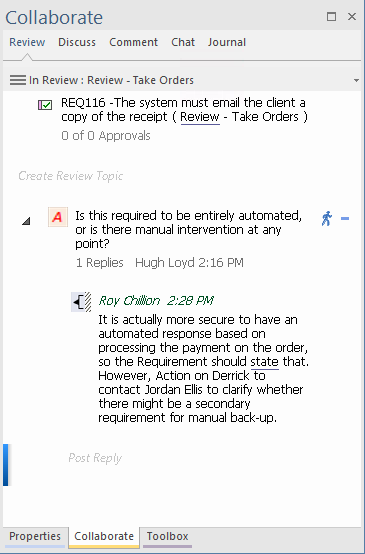
If the element has been assigned one or more Approvers, the message 0 out of <n> Approvals displays under the element name, followed by a user name item for each of the assigned Approvers. In the message, 0 is the count of approvals registered, and <n> is the number of Approvers required to approve the review of the element. If no Approvers have been assigned, no message displays.
Any existing review topics for the currently selected model element display in the body of the window in reverse date/time order, with the most recent topic at the top of the list.
When you have joined a review, that is your Active review until you leave the review again. The Review element links to the review topics and posts of each joined user until they select the 'Leave Review' context menu option.
When you want to continue adding to a review you have left, you can join it again using the 'Join Review' menu option.
Contributing to a Review
After you have joined a review, select the 'Start > Collaborate > Reviews > Review' ribbon option. The Collaborate window displays at the 'Review' tab. (Alternatively, press and select the 'Review' tab.)
Click on the element or the Navigation Cell for the diagram that you want to comment on, in the Review diagram or the Reviews view, to make that object the focus of the Collaborate 'Review' tab.
Alternatively, click on the object to review in the Browser window or a non-Review diagram and:
- Right-click on the object > Collaborate > Review
To create a topic for review or make a response to a topic, use the guidelines provided in this table.
Operation |
Action |
See also |
|---|---|---|
|
Create a review topic |
Below the element name, but above any existing review conversation, the message Create Review Topic displays. Note that an element under review can be locked against posting any further topics or responses, according to the element's status. In this case the message This Review is now <status triggering the lock> and cannot be updated displays instead. Double-click on the Create Review Topic message and type your topic as continuous text (no carriage returns). The text automatically wraps at the border of the Collaborate window. If you do need to break your text into paragraphs, press at the break point. When you have finished typing, click off the text or press the .
If user security is enabled and you have selected to show avatars, the discussion icon is replaced by an image representing the user who contributed that item. If the user does not have a personal avatar image, a default 'head and shoulders' silhouette displays as the avatar. |
Set User Avatar Review Status Locks Page |
|
Add a response |
Double-click on the 'Post Reply' message and type your response as continuous text. When you have finished typing, click off the text or press the .
You can also right-click on a post and select the 'Post Reply' menu option. All new replies are added underneath the review thread they are in response to. |
|
|
Edit postings |
Whilst you are typing a message, the editor automatically checks the spelling and underlines possible spelling errors in red. You can backspace or move the cursor to the errors to correct them. You can also move the cursor anywhere in the message body and add or delete text (press the ). Once you have posted a message, you can delete the whole message but you cannot edit it. |
|
|
Copy review topic text |
If you want to re-use some or all of the text of a review item, select the text before you save it and press to copy it to the clipboard. You can then paste the text into a new review item or into another document in Enterprise Architect. You can also paste copied text from the clipboard into the review item, by pressing . |
|
|
Set review topic status |
A new review topic has the status of 'Open', with no indicator. To change the status, right-click on the item and select either:
If the review topic already has one of these statuses, you can also select the 'Status | Open' option to return the topic to 'Open' status, indicated by the |
|
|
Set review topic priority |
As part of the review, you might want to identify the priority of a point being raised. It might be very important to act on the point, or it might be agreed that the point discusses a 'nice to have' feature that could be addressed at a later date. To set the priority, right-click on the review topic and select one of the options:
Alternatively, if you decide that an item does not need to be prioritized, select the 'Priority | <none>' option. This leaves the item icon as |
|
|
Set Approval status |
Only the named Approver is able to change the status or priority of their Approver item. To set the status, the Approver right-clicks on their Approver item and can select the 'Open' or 'Awaiting Review' options as for a reviewer. However, the third option in this case is 'Approved', which indicates that the selected element has completed review and all decisions and defined changes are approved. If the Approver selects the 'Approved' option, the indicator |
|
|
Delete a review topic or reply |
Right-click on the review topic or a reply, and select the 'Delete Selected' menu option. A prompt displays to confirm the deletion. Click on the . If you delete a review topic, all replies associated with that topic will be deleted as well. |
 icon display at the start of your text, and your user name, the time or date of posting and the number of replies (initially zero) display beneath your text
 icon, your user ID and the time of posting display above your text
 then displays to the right of the topic) or
 then displays to the right of the topic)
 icon.
icon. )
) ), or
), or )
) .
. Manage Reviews
Select the 'Start > Collaborate > Reviews > Manage Reviews' ribbon option.
(Alternatively, click on the 'In Review' button across the top of the 'Review' panel in the Collaborate window and select the 'Manage Reviews' option.)
This displays the Reviews view, listing all Review elements in your model in the 'Review' panel and the details of the elements under review in the right-hand panel. This allows you to quickly see what reviews are taking place and what is happening within any review you want to explore.
If you are already joined to a review, your active Review element is displayed in the list in bold. Otherwise, you can join a review by right-clicking on the Review element name and selecting the 'Join Review' option. Equally, you can leave your active review by right-clicking on it and selecting the 'Leave Review' option.
Click on the Review item you have joined, and check the elements under that review in the right-hand panel.
For each Review element there is at least one 'Set' segment, the first of which identifies the elements to be reviewed as added to the Review diagram. The second 'General' segment identifies any review activity on the Review element itself, or on any other elements in the model that are added to the review but not included on the diagram.
The columns of the display show a number of properties of each element in the review.

These properties include the start and end dates of the review period, the number of topics posted for the element, the number of those topics open or awaiting review and the number closed, the number of topics and replies posted in the last three days, between three and fifteen days ago, and more than fifteen days ago. You can change the sequence of these columns if you prefer, by dragging the column headings across the heading band.
You can right-click on:
- The column headers to add or remove columns using the 'Field Chooser', and to display the bar to filter the list for review topics having a specific property
- An element name to display the element Review topics and comments on the 'Review' tab of the Collaborate window
- An element name to find the element in the Browser window (or double-click on the item); this also opens the Collaborate window for the element
- An element name to locate any diagrams that contain the element
- The window and select the 'Refresh' option to refresh the list, to include any review topics that have been posted since you opened the review
The 'Field Chooser' dialog offers additional columns to add to the Review listing.
If you are not joined to a review, you can also create a new Review element by clicking on the 'New Review' option, as explained at the top of this topic.
Locking elements under review
Towards the final stages of a review of an element, the review managers might want to collate information before inviting final comments, approval or sign-off. Or they might close off the review of the element altogether and not allow further comments. In such scenarios, the review managers can set one or more status values at which an element under review will be automatically locked against the posting of review topics and replies. According to the way the managers want to progress elements through stages, the element under review might be assigned a subsequent status - or revert to a previous status - that did not lock the element against review comments.
You set up the locking status for elements under review using the 'Review Status Locks' page of the 'Manage Project Options' dialog. See the Review Status Locks Page Help topic.
In the Reviews view, if an element under review is locked because of its status but it has not been fully approved, its element-type graphic has a red circular icon overlaid by an exclamation point. If the item is expanded, it shows a message under the element name and above the Approver names. These indicators are illustrated here:
