| Prev | Next |
Assign Multiple Resources
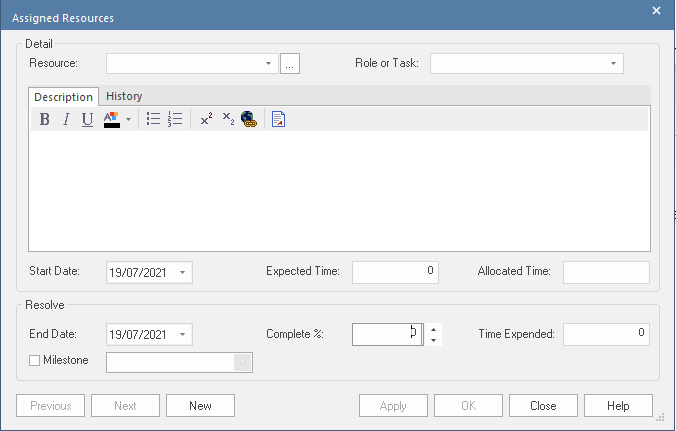
When you have a large unit of work associated with an element - such as a Package element - you might want to assign several resources to that element to perform that unit of work. You can assign each person individually, but if the resources have the same role or task you can assign all of them together in one operation, using the 'Assigned Resources' dialog.
This dialog is also used to edit Resource Allocations entered previously through either the same dialog or the Resource Allocation window.
Access
First, select an element, then:
|
Ribbon |
Construct > Resource Management > Gantt > Element View > right-click on element > Assign Resource |
|
Other |
On the Resource Allocation window, right-click on a resource assignment and click on the 'Modify Selected' option |
Assign Multiple Resources to an Element
Option |
Action |
See also |
|---|---|---|
|
Resource |
(To assign a single resource, simply type in the name or click on the drop-down arrow and select the name from the list. In Project Management, it is simpler to assign single resources directly through the Resource Allocation window.) For multiple resources, on the 'Assigned Resources' dialog, click on the
The 'Resource' field now shows the selected resources, but grayed out. The drop-down arrow also is not active. To change the resources in the field, click on the |
Resource Allocation |
|
Role or Task |
Either:
|
|
|
Description |
Type (and, if you prefer, format) a description of the work being done by the resources. |
Notes |
|
History |
As the task progresses, you add text to this tab to record the activities, progress, problems and outcomes of the task. |
|
|
Start Date |
This field defaults to today's date. If you want to assign a different start date for the task:
The field immediately changes to the selected date. |
|
|
Expected Time |
Type in the number of time units the task is expected to take. (The value must be an integer, so you cannot record part units.) The unit of time you adopt is by agreement within the project, and depends on the granularity of the work being recorded. Most tasks are completed in a number of hours or a number of days; use the smallest practical unit that you can record as a whole number. Apply the same units as used for the 'Allocated Time' and 'Time Expended' fields. |
|
|
Allocated Time |
Type in the number of time units the task can be spread over. (The value must be an integer, so you cannot record part units.) The unit of time you adopt is by agreement within the project, and depends on the granularity of the work being recorded. Most tasks are completed in a number of hours or a number of days; use the smallest practical unit that you can record as a whole number. Apply the same units as used for the 'Expected Time' and 'Time Expended' fields. |
|
|
End Date |
This field defaults to today's date. If you want to assign a different end date for the task:
The field immediately changes to the selected date. |
|
|
Complete % |
If the task is already in progress, type in the current percentage completion. |
|
|
Time Expended |
(When the task is eventually 100% complete, you will type in the number of time units it actually took. The value must be an integer, so you cannot record part units.) The unit of time you adopt is by agreement within the project, and depends on the granularity of the work being recorded. Most tasks are completed in a number of hours or a number of days; use the smallest practical unit that you can record as a whole number. Apply the same units as used for the 'Expected Time' and 'Allocated Time' fields. |
|
|
Milestone |
This checkbox and drop-down list allow linking the end date to the date of a Milestone element that is no more than seven days old. (Milestone elements form part of the structures developed using the Project Management Technology, which you can activate by selecting the 'Start > All Windows > Perspective > Construct > Project Management' ribbon option.) Click on the checkbox to activate the field, then click on the drop-down arrow and select the Milestone element from the list. |
Case Management Model and Notation (CMMN) |
|
Previous |
Click on this button to display the previous resource record in the sequence. |
|
|
Next |
Click on this button to display the next resource record in the sequence. |
|
|
New |
Click on this button to clear the fields on the dialog so that you can define a new resource allocation. |
|
|
Apply |
Click on this button to apply the changes to the currently-displayed element on a diagram, without closing the dialog. |
|
|
OK |
Click on this button to save the data you have entered, and close the dialog. |
|
|
Close |
Click on this button to discard the data you have entered, and close the dialog. |
|
|
Help |
Click on this button to display this Help topic. |
 button on the 'Resource' field to display the 'Assign Resource' dialog.
 Notes
- When the resource details are displayed on the Project Gantt Chart or Resource Allocation window, each resource has their own record containing, initially, the same data; however, each resource can be monitored and their progress recorded separately
- If you assign resources that are already in a multiple resource assignment to the selected element, a prompt displays for you to confirm that you are updating the assignment of that resource, or now omitting that resource from the existing assignment