| Prev | Next |
Edit Objects
Within any model in which you have the security permissions to create elements, you can also edit the Notes, Tagged Values, Resource Allocation and Testing details of any object in which they occur.
Firstly, display the property (Notes, Tagged Values, etc) that you want to edit in WebEA's WebEA Main View - Object Properties, or in the WebEA - Properties View.
On the right of the item field for these three properties you will see a  icon, which indicates that you have the ability to edit that property.
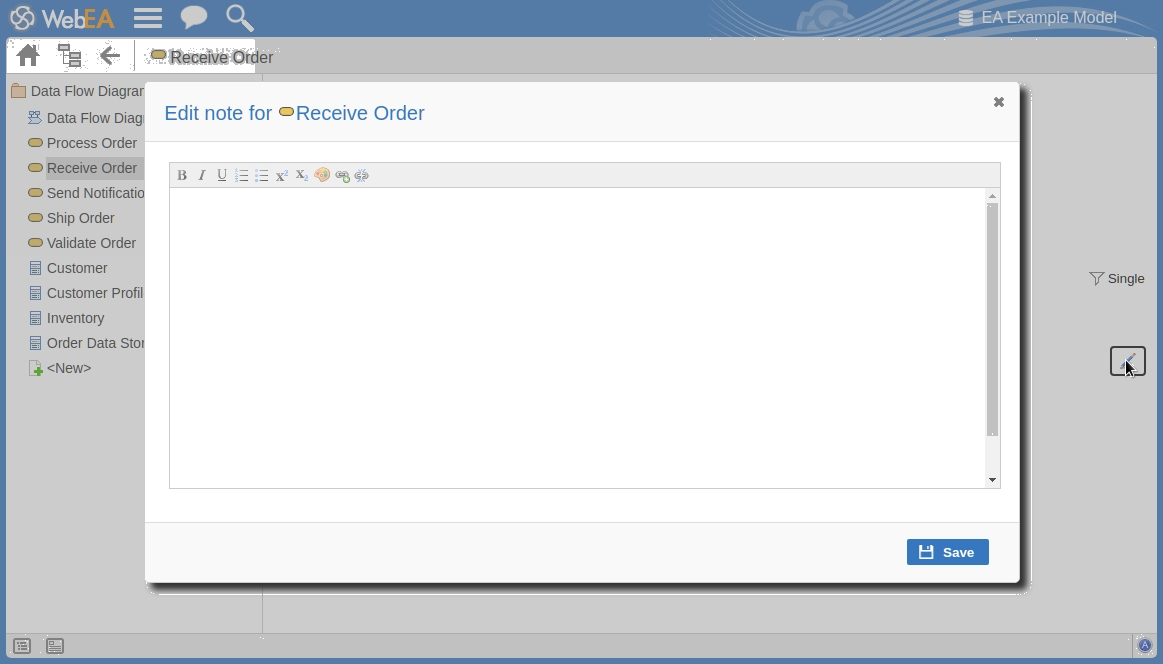
Edit Notes
To edit the notes of an object, click on the icon for the field. The 'Edit note for <object type>' dialog displays.
You can add, delete and change text, and use the formatting tools in the Notes toolbar; that is, for a selected text string, add:
- Bold
- Italic
- Underline
- Numbered List
- Bulleted List
- Superscript
- Subscript
- Text color
The final two toolbar buttons allow you to add or remove a hyperlink from some selected text.
To add a hyperlink:
- Select the text in the editor.
- Click on the .
- Enter the URL for the hyperlink.
- Click on the .
To remove a hyperlink:
- Select the text.
- Click on the .
Note: This function supports hyperlinks to Web URLs only.
You can also right-click on the selected text and select options from the browser context menu to:
- Undo the last change
- Move (cut) the text string into the buffer for pasting
- Copy the text string into the buffer for pasting
- Paste text from the buffer into the 'Notes' field
- Delete the selected text
- Select all the text in the 'Notes' field
- Search for the selected text string on the internet
- Turn spell-checking on and off (if on, possibly misspelt text is underlined in red)
- Add a different language dictionary to check spelling against (this would probably have been done already for your web browser)
When you have finished editing the text, click on the . A confirmation message briefly displays and you are returned to the object 'Properties' view.
Edit Tagged Values
To edit the Tagged Values of an object, click on the icon to the right of the Tagged Values list. The 'Edit Tagged Values' dialog displays.

Each tag provides an editable field. Structured Tagged Value types such as 'Memo' and 'Enumeration' tags provide the appropriate controls for entering a value. After modifying one or more tags use the 'Save & Close' button to save the new value/s or select 'Close' to discard the changes.
Edit Tests
The tests assigned to an element support a range of situations including user acceptance and scenario. You could be asked to define or perform tests on parts of a model of relevance to you as a customer or user, or you might want to add information obtained from other people you have asked to perform an evaluation. Therefore, you might need to edit test records to update them with your information.
To edit a test record, display the appropriate element in WebEA's Main View, click on the and select the appropriate test from the list.
Once the test is displayed click on the icon. The 'Edit Test for <element name>' dialog displays.
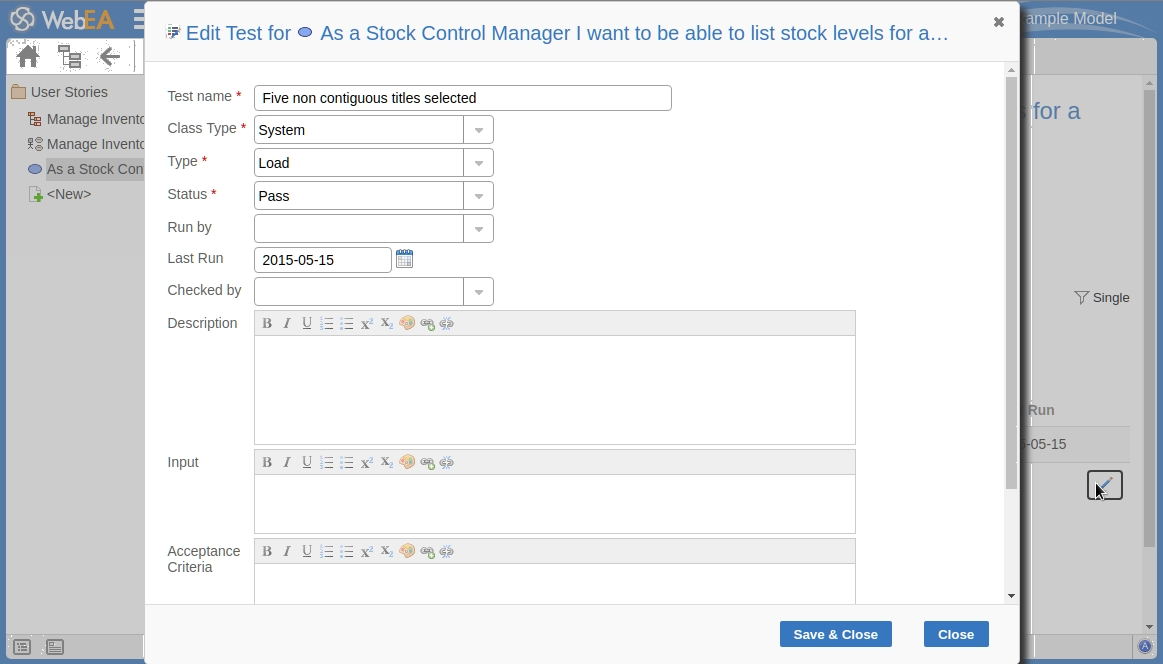
Edit Test for <> page
Mandatory fields on the dialog are indicated by a red asterisk (*).
Complete the fields as directed here.
Field |
Action |
See also |
|---|---|---|
|
Test name |
If necessary, type a new name for the Test. |
|
|
Class type |
In necessary, click on the drop-down arrow and select a different test group for the test; that is:
|
|
|
Type |
If necessary, click on the drop-down arrow and select a new test type; that is:
|
|
|
Status |
If necessary, click on the drop-down arrow and select a new test status; that is:
|
|
|
Run by |
If the test has been run, click on the drop-down arrow and select the name of the person who ran it. |
|
|
Last Run |
If the test has been run, click on the calendar icon and select the date on which the test was most recently run. |
|
|
Checked by |
If the test has been run, click on the drop-down arrow and select the name of the person who checked the test execution and results. |
|
|
Description |
Type in a description of the test, what it was intended to show and - if the test has been run - what the test situation and results were. You can format this text using the facilities provided in the Notes toolbar, as described in the Edit Notes section. |
|
|
Input |
Type a description of what actions or parameters are or were required as input to this test. You can format this text using the facilities provided in the Notes toolbar, as described in the Edit Notes section. |
|
|
Acceptance Criteria |
Type a description of what criteria must be or were satisfied to indicate that the test has passed. You can format this text using the facilities provided in the Notes toolbar. |
|
|
Results |
Type a description of the expected and/or actual results of this test. You can format this text using the facilities provided in the Notes toolbar. |
|
|
Save |
Click on this button to submit the details and update the Test record on the selected element. A confirmation message briefly displays and you are returned to the object 'Properties' view |
Edit Resource Allocation
The resources allocated to an element can include reviewers in various roles, and you might be allocated as a resource yourself. Alternatively, you could have allocated another person as a reviewer. Therefore, you might need to edit a resource allocation to record either your own progress in a review, or the progress of the resource you have allocated.
To edit the resource allocation, display the appropriate element in WebEA's Main View, click on the and select the appropriate resource from the list.
Once the resource is displayed, click on the icon. The 'Edit resource allocation for <element name>' dialog displays.
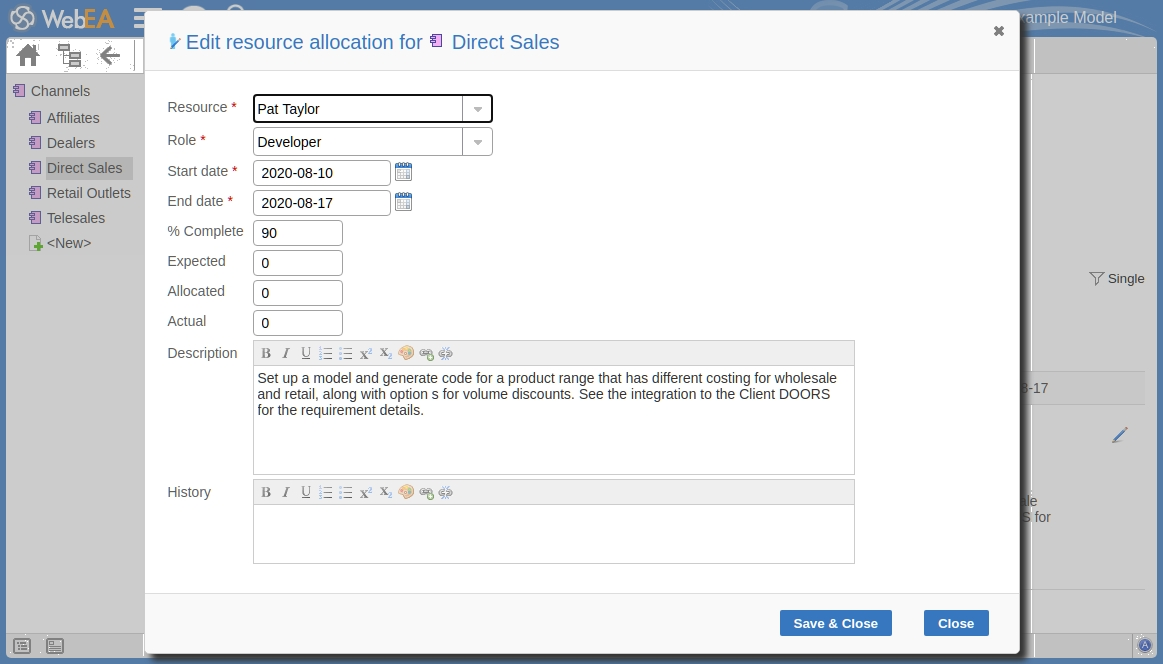
Edit Resource Allocation for page
Notice that this page has a few more fields than the initial 'Add resource allocation ...' page.
Mandatory fields on the dialog are indicated by a red asterisk (*).
Complete the fields as directed here.
Field |
Action |
See also |
|---|---|---|
|
Resource |
If necessary, click on the drop-down arrow and select the name of a different person to be allocated as the resource. |
|
|
Role |
If necessary, click on the drop-down arrow and select a different role for the resource in this work. |
|
|
Start Date |
If necessary, click on the calendar icon and select a different date on which the resource started or is expected to start the assigned work. |
|
|
End Date |
If necessary, click on the calendar icon and select a different date on which the resource completed or is expected to complete the assigned work. |
|
|
% Complete |
Click on the up and down arrows to change the field value to the percentage completion of work that the resource has achieved. |
|
|
Expected |
Type in the number of whole time units the task is expected to take. The value must be an integer; you cannot record part units. The unit of time you use will be identified by the Project Manager, and depends on the granularity of the work being recorded. Most tasks are completed in a number of hours or a number of days; use the smallest practical unit that you can record as a whole number, and use the same units for the expected, allocated and actual times. |
|
|
Allocated |
Type in the number of whole time units the task can be spread over. For example, you might expect the task to take 2 days of work performed at any point over a period of 5 days. |
|
|
Actual |
If the task is 100% complete, type in the number of whole time units it actually took. |
|
|
Description |
If necessary, edit the description of the resource allocation, perhaps to explain the changes you have made to earlier fields. You can format this text using the facilities provided in the Notes toolbar, as explained in the Edit Notes section. Before changing the text, you might want to copy it to paste into the 'History' field for editing there. |
|
|
History |
Optionally, paste or type in an explanation of what has previously taken place with this Resource Allocation. You can also format this text, using the facilities in the Notes toolbar. |
|
|
Save |
Click on this button to submit the details and update the Resource Allocation record on the selected element. A confirmation message briefly displays and you are returned to the object 'Properties' view. |