| Prev | Next |
Create Test Records
When you need to create or edit a test record on an element, for any of the six types of test, you can do so using either:
- The Test Cases window (to quickly set up or change test records, and perform operations on them)
- The 'Test Details' dialog (To create test records with more Notes information, which you can also add through the Notes window)
- The Properties window for Test items (to edit the properties of existing tests - see the Properties Window for Test Items Help topic)
Whichever type of test you are recording, you complete effectively the same fields.
Access
|
Ribbon |
Construct > Test Management > Tests > <test class> : overtype Add new <testtype> (Test Cases window) |
|
Keyboard Shortcuts |
Click on the element : > Testing : <test class> : overtype Add new <testtype> (Test Cases window) Click on the element on a diagram | Press the (Test Cases window) |
|
Other |
On the Test Cases window, double-click on the Test item to display the 'Test details' dialog |
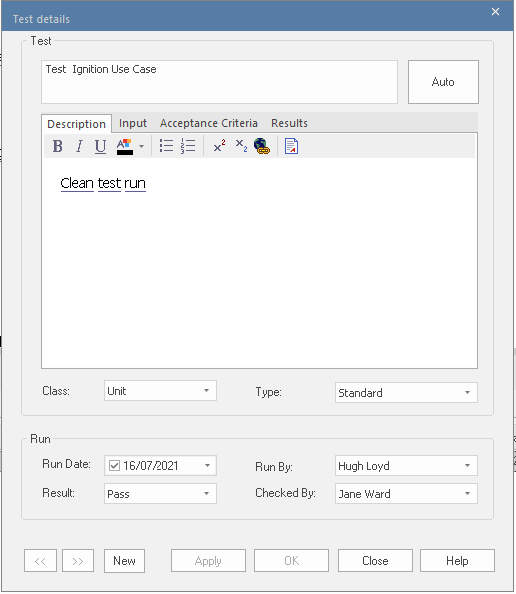
Create a Test Record in the Test details Dialog
Field/Button |
Action |
See also |
|---|---|---|
|
Test |
Type the name of the test. This can be any alphanumeric text string you want to use. |
|
|
Auto |
As an alternative to typing in the name, click on this button to insert predefined auto-counter text; if you do not have auto-counter text configured, an information message displays. If you already have some text in the 'Test' field, it is over-written by the auto-counter text. |
Set Auto Naming and Auto Counters |
|
Class |
This defaults to the class of test you selected in displaying the dialog. If this is not the class you require, click on the drop-down arrow and select the appropriate value. |
|
|
Type |
Click on the drop-down arrow and select the value indicating the type of test (Load, Regression or Standard). You cannot type in any alternative types. |
|
|
Run Date |
Click on the check box and then on the drop-down arrow and select the date on which the test is to be run (or when it was last run). |
|
|
Run By |
Click on the drop-down arrow and select the name of the person who is to run, or has run, the test. The list selection defaults to your name as the current user. (Possible values are derived from the Project Author definitions in the 'People' dialog - select the 'Settings > Reference Data > Model Types > People > Project Authors' ribbon option.) |
|
|
Result |
Click on the drop-down arrow and select the value indicating the current status of the test (Not Run, Pass, Fail, Deferred or Canceled). You cannot type in any alternative values. |
|
|
Checked By |
If you have provided a Run date, when you click on this field it defaults to your user name as the current user. If you have not provided a Run Date, click on the drop-down arrow; the list selection defaults to your user name as the current user. If you are not the person who is to check, or has checked, the results of the test, scroll to and select the name of the relevant person . |
|
|
Description |
Type a description of the test; you can format the text using the Notes toolbar at the top of the field. The text you type here is also shown in the Notes window, under the 'Description' heading. |
Notes Toolbar |
|
Input |
Type in the input data provided to the test; you can format the text using the Notes toolbar at the top of the field. The text you type here is also shown in the Notes window, under the 'Input' heading. |
|
|
Acceptance Criteria |
Type the acceptance or test success conditions; you can format the text using the Notes toolbar at the top of the field. The text you type here is also shown in the Notes window, under the 'Acceptance Criteria' heading. |
|
|
Results |
Type the results of the last test; you can format the text using the Notes toolbar at the top of the field. The text you type here is also shown in the Notes window, under the 'Results' heading. |
|
|
Apply 
|
Click on this button to save the data you have entered and to add the entry to the Test Cases window and the Browser window, keeping the 'Test details' dialog open. |
|
|
OK |
Click on this button to save all new data and close the 'Test details' dialog. |
|
|
New |
Click on this button to clear the data entry fields ready for defining another test. |
|
|
left chevron/right chevron |
If there are existing tests, click on these buttons to display the details of the previous test or next test in the sequence. |
|
|
Close |
Click on this button to discard all unsaved data and close the dialog. |
Create a Test Record in the Test Cases Window

Depending on your screen width and the fields you have exposed in the Test Cases window using the 'Field Chooser' dialog, you might need to scroll the window left and right to see all fields. As it is possible to change the sequence of fields across the window, the fields might not be in the order as documented.
Field/Button |
Action |
See also |
|---|---|---|
|
Test |
Overtype the Add new <test type> text with the name of the new test. |
|
|
Status |
Click on the field and on the drop-down arrow, and select the appropriate status. |
|
|
Type |
Click on the drop-down arrow and select the appropriate test type - Load, Regression or Standard. |
|
|
Run By |
Click on the drop-down arrow and select the name of the person who ran - or will run - the test. You can also start typing the name of the person, until the auto-complete facility fills in the rest of the name. |
|
|
Checked By |
Click on the drop-down arrow and select the name of the person who checked - or will check - the results of the test. You can also start typing the name of the person, until the auto-complete facility fills in the rest of the name. |
|
|
Description |
Type in a short description or explanation of the test. |
|
|
Run Date |
Type in the date on which the test was last executed, in dd/mm/yyyy format. |
Notes
- To delete an item, right-click on it in the Test Cases window and click on the 'Delete' option in the context menu; in response to the confirmation prompt, click on the
- A further possibility for generating and editing Test items is to right-click on the Testing category in the 'Details' tab of the Inspector window - or the required item within the list - and select menu options to perform the required operation
- To change the element for which to create or edit Test items, click on the element in a diagram or the 'Project' tab of the Browser window
- In the Corporate, Unified and Ultimate Editions of Enterprise Architect, if security is enabled you must have 'Manage Tests' permission to add, update and delete Test records